Tired of kicking a tangled mess of cables every time you adjust your chair? That jumbled rat’s nest under your desk isn’t just an eyesore—it’s a productivity killer, a safety hazard, and a constant source of low-grade stress you don’t need. The good news? You don’t have to become a professional organizer or spend hours with zip ties to reclaim your workspace. Under-desk cable trays have evolved from flimsy afterthoughts into sophisticated organization systems that can transform your chaotic tangle into a streamlined, invisible network in less time than it takes to brew your morning coffee.
Whether you’re setting up a home office that needs to look professional on video calls, optimizing a corporate workstation for safety compliance, or finally tackling the cable nightmare behind your gaming battlestation, the right cable tray system is your secret weapon. But not all trays are created equal, and choosing the wrong one can leave you with sagging metal, inaccessible outlets, or a solution that works today but fails tomorrow when you add that second monitor. Let’s dive deep into what makes an under-desk cable tray truly effective and how to select the perfect system for your specific needs.
Top 10 Under-Desk Cable Trays for Cluttered Desks
Detailed Product Reviews
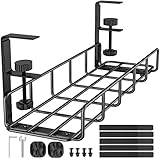
1. Under Desk Cable Management Tray No Drill, Metal Mesh Cable Management Under Desk with Clamp Mount, 2 Hole Cable Tray with Wire Management and Cord Organizer for Home Office Standing Desk

Overview: This under-desk cable management tray offers a drill-free solution for organizing cables in home offices or standing desks. Constructed from carbon steel with a mesh design, it clamps securely to desk edges without permanent modifications, preserving your furniture’s integrity while keeping cables hidden from view.
What Makes It Stand Out: The 15-pound weight capacity exceeds most competitors, accommodating multiple power strips and adapters with ease. Integrated rubber pads protect desk surfaces from scratches, while the dual-hole design on each side allows flexible cable routing. The reversible mounting system supports both inward and outward installation, adapting to various desk configurations and user preferences seamlessly.
Value for Money: At $16.99, this tray delivers premium metal construction typically found in higher-priced alternatives. The durable carbon steel build ensures longevity, making it a cost-effective investment compared to plastic options that may sag or break over time. The included features like protective pads and versatile mounting add significant value for budget-conscious buyers.
Strengths and Weaknesses: Strengths include tool-free installation, sturdy construction, protective padding, and versatile mounting options. The mesh design prevents dust accumulation while maintaining airflow. Weaknesses include a relatively compact size that may not suit users with extensive cable collections, and the 0.4"-2" thickness range might not fit all desk types, particularly ultra-thick executive desks.
Bottom Line: Ideal for professionals seeking a robust, non-permanent cable solution. The high weight capacity and protective features make it perfect for standing desks and premium furniture where surface protection is paramount.
2. Under Desk Cable Management Tray White, Cinati Wire Organizers No Drill, Cable Tray with Clamp for Wire Management, Cord Organization Box for Office, Home - No Damage to Desk

Overview: The Cinati white cable management tray provides a clean, minimalist solution for cord organization without drilling. This metal organizer attaches via clamps to desks of various materials, offering damage-free installation for office and home environments while maintaining a sleek appearance.
What Makes It Stand Out: Its pristine white finish distinguishes it from typical black metal options, blending seamlessly with light-colored furniture and modern decor. The fully welded, powder-coated construction resists rust and dust accumulation better than basic wire frames. Anti-scratch mats provide superior desk protection, while the 0.4"-2.4" clamp range accommodates a broader desk thickness variety than many competitors, including glass and wood surfaces.
Value for Money: Priced at $14.44, this tray offers excellent affordability without sacrificing quality. The inclusion of four cable clips and six cable ties adds immediate utility value, saving additional purchases. While its 10-pound capacity is modest, it’s sufficient for most standard setups with a few power strips and adapters, making it a smart choice for cost-conscious users prioritizing aesthetics.
Strengths and Weaknesses: Strengths include the attractive white finish, comprehensive accessory bundle, wide desk compatibility, and reversible mounting options. The protective anti-scratch mats are a thoughtful touch for preserving furniture. Weaknesses include a lower weight capacity compared to steel alternatives and the solid metal design may restrict airflow around power adapters that generate heat, potentially causing warm equipment to run hotter.
Bottom Line: Perfect for users with lighter cable loads who value aesthetics and desk protection. The white finish makes it ideal for modern, bright office spaces where traditional black organizers would clash with decor.
3. Litwaro Under Desk Cable Management Tray 2 Pack, No Drill, Organizer with Clamp Easy to Install for Standing Cord Organizer, Wire Damage Desk, Black, 13.38’’-2 pack

Overview: The Litwaro 2-pack cable management trays provide double the organizational capacity for larger setups or multiple workstations. These black metal mesh trays install without drilling, using clamp mounts that protect desk surfaces while keeping cables neatly contained and off the floor.
What Makes It Stand Out: Offering two units for the price of one competing single tray, this package delivers exceptional value for multi-desk households or complex cable arrangements. Each tray supports 15 pounds and features the same carbon steel construction and rubber-padded clamps as premium singles. The dual-hole side design on each basket enables flexible cable routing between units, creating an integrated system rather than isolated organizers.
Value for Money: At $32.99 for two trays, the per-unit cost of $16.50 matches single-tray competitors while providing expanded coverage. This makes it economical for users needing to manage cables across two desks or one extensive setup with multiple power sources. The robust construction ensures both units will last for years, maximizing long-term value and reducing future replacement costs.
Strengths and Weaknesses: Strengths include the two-pack convenience, high weight capacity, protective rubber pads, and versatile installation options that work on desks from 0.4" to 2" thick. The mesh design promotes ventilation and prevents dust buildup around heat-generating adapters. Weaknesses include the fixed cost may be unnecessary for users with minimal cable needs, and the 13.38" length per tray may leave gaps in extra-long desk configurations requiring creative placement.
Bottom Line: An excellent choice for home offices with multiple workstations or power users with extensive peripherals. The dual-pack approach provides flexibility that single-tray solutions cannot match, making it a smart investment for growing setups.
4. Xpatee 2 Pack Cable Management Under Desk Tray, 31.4" No Drill Under Desk Wire Management with Upgraded Clamp, Metal Cord Organizers for Desk with Cable Organizers, PC Cable Management Rack, Black

Overview: The Xpatee 2-pack offers an impressive 31.4 inches of total cable management coverage when trays are aligned. These black metal cord organizers feature upgraded clamps and a hollow curved design that accommodates not just cables but small office supplies, maximizing under-desk utility.
What Makes It Stand Out: The ability to create one continuous 31.4-inch tray sets this apart from competitors offering only discrete units. The hollow curved design increases depth to 5.9 inches, allowing storage of items like notebooks or small routers. Anti-scratch mats and reversible mounting provide installation flexibility without desk damage, while the upgraded clamps ensure secure attachment even with heavier contents.
Value for Money: At $21.99 for two trays totaling over 30 inches, this package undercuts many premium single-tray options on a per-inch basis. The inclusion of four cable clips and eight ties enhances value. While the 10-pound capacity per tray is moderate, the expanded length makes it ideal for distributed loads across a wide area, offering better organization per dollar than shorter alternatives.
Strengths and Weaknesses: Strengths include exceptional total length, versatile hollow design, comprehensive accessories, and wide desk compatibility (0.4"-2.4"). The upgraded clamps offer secure attachment. Weaknesses include the moderate weight capacity may limit heavy power strip storage, and the curved design might not suit all aesthetic preferences or fit flush against flat desk surfaces.
Bottom Line: Perfect for users with long desks or numerous devices requiring extended coverage. The combined length and storage versatility make it superior for comprehensive cable concealment and under-desk organization.
5. Univivi No Drill Under Desk Cable Management Tray, 36" Cord Organizer for Table, Clamp/Screw Mount Desk Cable Management, Premium Fabric Cable Management Tray for Office, Home

Overview: The Univivi cable management tray distinguishes itself with premium fabric construction and dual installation options. At 36 inches long, this organizer accommodates extensive cable collections while offering both clamp and screw mounting for maximum versatility across different desk materials.
What Makes It Stand Out: The 600D oxford fabric is flame-retardant, providing safety benefits over metal alternatives. The innovative unfolding design allows easy access for adding or removing cables without disassembly. Built-in ties secure items neatly, while the bottom support structure maintains shape under heavy loads, preventing sagging that plagues lesser fabric organizers.
Value for Money: At $39.99, this is a premium option justified by unique features and large capacity. The dual-mount system eliminates compatibility concerns, potentially saving replacement costs. While pricier than metal alternatives, the fabric construction and safety certifications appeal to users prioritizing fire safety and flexibility, making it worth the investment for the right environment.
Strengths and Weaknesses: Strengths include impressive 36-inch length, flame-retardant fabric, dual mounting options, and innovative unfolding access. The heavy-duty clamp supports substantial weight. Weaknesses include requiring 5.3 inches of clearance, which may not work with desks featuring drawers or back rails. Fabric may accumulate dust more readily than mesh metal designs and could be harder to clean.
Bottom Line: Ideal for safety-conscious users with extensive cable needs and compatible desks. The premium features and large capacity justify the higher price for those needing maximum organizational flexibility and fire-resistant properties in professional environments.
6. Under Desk Cable Management Tray Black, Litwaro Cable Management Under Desk No Drill, 25’’ Cable Tray with Clamp for Wire Management, Cord Organizer for Office, Home - No Damage to Table

Overview: The Litwaro Under Desk Cable Management Tray delivers a robust, drill-free solution for workspace cable organization. This 25-inch black metal tray features a sturdy clamp-mount design that preserves desk integrity while supporting up to 30 pounds of cables, power strips, and adapters. Engineered for straightforward installation, it clamps onto desks between 0.4 and 2 inches thick in minutes, making it ideal for renters, standing desk users, and anyone avoiding permanent modifications.
What Makes It Stand Out: The breathable mesh metal construction distinguishes this tray by preventing dust accumulation and promoting airflow to reduce electronic overheating. Its versatile dual-orientation design allows inward mounting for complete concealment or outward positioning for convenient power strip access. The protective rubber-padded clamps ensure scratch-free attachment while providing industrial-grade stability that outperforms adhesive alternatives.
Value for Money: At $32.99, the Litwaro commands a premium over entry-level options but justifies the cost through superior length and weight capacity. Most competitors offer shorter trays or lower load ratings at similar price points. The durable metal construction and repositionable design deliver long-term value, particularly for users with extensive cable infrastructure who need a reliable, non-permanent solution.
Strengths and Weaknesses: Strengths include impressive 30-pound capacity, generous 25-inch length, drill-free installation, breathable mesh design, and reversible mounting. The clamp system offers greater reliability than adhesives for heavy loads. Weaknesses involve compatibility constraints—it won’t work with glass desks, beveled edges, or surfaces outside the 0.4-2 inch thickness range. The metal construction adds weight compared to plastic alternatives.
Bottom Line: The Litwaro tray excels for users with substantial cable management needs who prioritize durability and flexibility. Its high capacity and thoughtful design make it worth the investment, provided your desk meets compatibility requirements. For standard wooden or metal desks, this represents a premium, non-permanent organization solution that will outlast cheaper alternatives.
7. 15.7” Under Desk Cable Management Tray, No Drill Steel Cable Tray Organizers, Wire Management Tray Cable Rack with Clamp Mount, Metal Under Desk Tray with Wire and Cord Organizer (Black, 1 Pack)
Overview: This compact 15.7-inch steel cable tray provides an economical, screw-free cable management solution for diverse desk surfaces. Constructed from powder-coated carbon steel, the unit features adjustable clamps with soft silicone pads that prevent surface damage. The package includes five cord organizers and two computer wire organizers, delivering a complete organizational toolkit beyond the main tray itself.
What Makes It Stand Out: Exceptional surface compatibility sets this product apart—it safely mounts to wood, glass, metal, and marble tables thanks to its protective silicone design. The hollow curved tray shape facilitates easy cable routing and power strip placement. Unlike many competitors, it ships with a comprehensive accessory bundle, eliminating separate purchases of cable management extras.
Value for Money: At $17.99, this represents outstanding value for budget-conscious buyers. The included seven organizational accessories would typically cost $10-15 separately. While shorter than premium alternatives, its versatility across desk materials and complete package make it a cost-effective choice for basic to moderate cable management needs without sacrificing quality.
Strengths and Weaknesses: Strengths include broad surface compatibility, protective silicone padding, budget-friendly pricing, and generous accessory bundle. The screw-free clamp installation preserves desk finishes and enables easy repositioning. Weaknesses involve the modest 15.7-inch length, which may prove insufficient for complex setups, and unspecified weight capacity that likely trails heavy-duty models. Single-pack quantity limits coverage area for larger desks.
Bottom Line: This tray serves users seeking an economical, versatile solution that works on delicate surfaces like glass or marble. The protective design and included accessories make it ideal for smaller desks or modest cable collections. While not suited for heavy-duty applications, it delivers remarkable functionality per dollar spent and outperforms basic adhesive options in durability.
8. No-Screw Under Desk Cable Management Tray - Self-Adhesive Installation, Cord Management, Cable Tray, Under Desk Wire Organizer - Black Set of 2

Overview: This two-pack cable management system employs industrial-strength self-adhesive backing to eliminate clamps and screws entirely. The black trays install in minutes without tools, providing immediate under-desk organization for cables, power strips, and transformers. Marketed as a no-screw solution, this set targets users seeking maximum installation simplicity and flexibility in tray positioning across multiple workstations.
What Makes It Stand Out: The adhesive mounting system represents the primary differentiator, bypassing desk thickness limitations and compatibility issues that plague clamp-based models. User-validated feedback highlights the adhesive’s exceptional strength and durability over time. The twin-pack configuration offers coverage for extended desk areas or two separate workstations at a price comparable to single premium trays.
Value for Money: At $32.95 for two trays, the value centers on quantity and installation convenience. While individual tray capacity may not match heavy-duty metal alternatives, the dual-unit approach provides versatility. The adhesive method saves significant installation time and eliminates desk damage risk, justifying the cost for renters or those with unconventional desk designs.
Strengths and Weaknesses: Strengths include truly tool-free installation, universal surface compatibility within adhesive limits, twin-pack quantity, and strong user-confirmed adhesive performance. The design efficiently accommodates multiple cables and transformers. Weaknesses involve potential adhesive degradation over time, especially on porous or textured surfaces, and limited repositionability once mounted. Weight capacity likely falls short of clamp-based metal trays, and removal may damage surfaces or leave residue.
Bottom Line: These adhesive trays suit users prioritizing installation speed and simplicity over maximum load capacity. They’re ideal for renters or desks where clamps won’t work, but require confidence in adhesive longevity. For permanent setups on smooth, clean surfaces, they deliver excellent dual-tray value. Consider clamp alternatives for heavy equipment or if future repositioning is anticipated.
9. 2 Pack Cable Management Under Desk Black, Cinati 32" Large Cable Management Tray, Under Desk Alloy Steel Wire Organizers, Cord Hider Tray for Office and Home - Tape or Screw Installation

Overview: Cinati’s two-pack system features a distinctive C-shaped design with extra height to accommodate bulky adapters and MacBook chargers. Each 16-inch tray measures 5x6 inches, providing substantial volume for complex cable arrangements. The alloy steel construction supports 11 pounds per tray and offers dual mounting methods: adhesive tape for smooth surfaces or screws for wooden desks, ensuring broad compatibility with various furniture types.
What Makes It Stand Out: The elevated C-shaped profile creates significantly more vertical space than flat trays, solving common problems with oversized power bricks. The hybrid mounting approach provides installation flexibility unmatched by single-method competitors. Premium-grade metal construction ensures durability, while the included hardware package—four screws, four adhesive stickers, and a 5-meter cable tie roll—delivers complete setup materials.
Value for Money: At $29.99 for two robust trays plus comprehensive accessories, this package presents strong value. The C-design effectively doubles usable space compared to standard flat trays at similar price points. While the 11-pound capacity seems conservative given the size, the overall material quality and installation versatility justify the investment for users with bulky adapters.
Strengths and Weaknesses: Strengths include the spacious C-shaped design, dual mounting options, premium metal construction, and complete accessory bundle. The trays work with various desk types including lift-up and L-shaped configurations. Weaknesses involve the modest 11-pound weight limit that may constrain heavy power strips, and potential adhesive reliability concerns when loaded near capacity. The larger profile may interfere with knee space on shallower desks.
Bottom Line: Cinati’s system excels for users managing oversized adapters and seeking installation flexibility. The C-design solves common capacity issues, while dual mounting options accommodate any desk situation. Verify your desk clearance and load requirements, but for most office setups, these trays deliver superior space efficiency and adaptability at a competitive price point.
10. Under Desk Cable Management Tray Black, Cinati Wire Organizers No Drill, Cable Tray with Clamp for Wire Management, Cord Organization Box for Office, Home - No Damage to Desk

Overview: Cinati’s single-tray cable management solution offers a compact, clamp-based organizer for smaller-scale cable control. Measuring 13.4 inches long with a 10-pound capacity, this metal tray features anti-scratch protective mats and reversible mounting orientation. The package includes four cable clips and six ties, providing immediate organizational accessories for straightforward installations on desks 0.4 to 2.4 inches thick.
What Makes It Stand Out: The anti-scratch mat design provides enhanced desk protection compared to standard rubber pads, addressing concerns about clamp-induced surface damage. Its dual-orientation capability allows inward mounting for concealment or outward positioning for accessibility. The fully welded, powder-coated construction resists rust and dust accumulation, ensuring longevity in various environments.
Value for Money: At $17.09, this represents one of the most economical clamp-based solutions available. The inclusion of clips and ties adds practical value, while the protective mat design prevents costly desk damage. While capacity and length trail premium models, the price-to-quality ratio excels for users with modest cable management needs who still demand durable construction.
Strengths and Weaknesses: Strengths include budget-friendly pricing, superior desk protection via anti-scratch mats, versatile inward/outward installation, and included organizational accessories. The welded metal construction ensures durability despite the low price. Weaknesses involve the limited 13.4-inch length, which suits only basic setups, and the 10-pound capacity that restricts heavy power strip usage. Single-pack availability limits coverage for larger desks.
Bottom Line: This Cinati tray serves users needing simple, affordable cable management without sacrificing desk protection. Its compact size fits smaller desks perfectly, while the protective design makes it safe for delicate surfaces. For basic cable organization with quality construction at a minimal price, this delivers exceptional value. Upgrade to longer trays only if your setup exceeds its modest but adequate capacity.
Why Your Under-Desk Chaos Deserves Immediate Attention
The Hidden Psychological Cost of Cable Clutter
That tangled mess isn’t just physically messy—it’s mentally draining. Research in environmental psychology consistently shows that visual clutter elevates cortisol levels and reduces your brain’s capacity for focused work. Every time your eyes unconsciously register those dangling cords, you’re experiencing a micro-dose of stress that compounds throughout the day. An organized underbelly to your workspace creates what experts call “visual closure,” allowing your brain to stop processing the chaos and dedicate those cognitive resources to actual work. The difference between a visible tangle and a clean, organized tray system is measurable in both reduced anxiety and improved task completion rates.
Safety Hazards Lurking in Plain Sight
Beyond aesthetics, loose cables represent genuine workplace dangers. OSHA reports hundreds of office-related trip and fall incidents annually directly attributed to unsecured cords and cables. Power cables coiled tightly together generate heat through induction, creating potential fire risks, especially when buried under dust bunnies. Liquid spills that seep into power strips or cable bundles can cause short circuits. Under-desk trays elevate cables away from floor-level hazards, improve air circulation around power adapters, and keep your workspace compliant with basic office safety standards that your insurance provider cares about deeply.
The Productivity Drain You Can Measure
How many times have you crawled under your desk to trace a cable, unplug the wrong device, or fight with a tangled cord when moving equipment? Each interruption might seem minor—two minutes here, three minutes there—but aggregated across weeks and months, you’re losing hours of productive time. More significantly, these interruptions break your flow state, that crucial zone of deep work where real progress happens. A properly implemented cable tray system reduces equipment changeover time by up to 85% and virtually eliminates accidental disconnections that can derail your focus.
Understanding the Anatomy of Modern Cable Trays
What Exactly Qualifies as an Under-Desk Cable Tray?
The term “cable tray” encompasses a surprisingly diverse family of solutions. At its core, it’s any under-desk mounting system designed to route, support, and conceal cables and related accessories. Traditional designs feature a basket-style wireframe construction, but modern iterations include solid-bottom troughs, modular track systems, magnetic channels, and hybrid designs that integrate power distribution. The evolution from simple J-hooks to today’s engineered solutions reflects our increasingly complex relationship with technology. Understanding these categories helps you match the tray type to your specific equipment ecosystem rather than defaulting to whatever your office supply store stocks.
The Transformation Timeline: From Chaos to Order
Most users report that the actual “aha moment” of cable organization happens in stages. First comes the physical installation—typically 15-45 minutes depending on complexity. Then there’s the initial cable routing, which forces you to confront just how many devices you’ve accumulated. The real magic happens over the following week as you naturally refine the arrangement, discovering that adding a new device no longer requires a complete reorganization. Quality tray systems create a maintenance-free ecosystem where cables have designated pathways, power strips have secure homes, and future modifications take seconds rather than requiring a complete teardown.
Critical Features That Separate Winners from Wannabes
Material Science: Steel Mesh vs. Solid Steel vs. High-Grade Plastics
The material choice impacts everything from weight capacity to heat management to long-term durability. Powder-coated steel mesh offers superior ventilation and lighter weight, typically supporting 15-25 pounds while allowing dust to fall through rather than accumulate. Solid steel trays provide maximum load capacity—up to 50+ pounds for heavy power bricks and industrial equipment—but can trap heat if ventilation holes aren’t strategically placed. High-grade ABS or polycarbonate plastics resist corrosion and offer electrical insulation benefits, but premium options are essential as cheap plastics become brittle and sag over time. For most knowledge workers, a steel mesh design hits the sweet spot of strength, ventilation, and cost-effectiveness.
Weight Capacity: The Math Most People Get Wrong
Here’s where specifications often mislead. A tray rated for 20 pounds might technically support that weight, but distributed how? Concentrated loads from multiple power strips and bulky adapters create stress points that cause sagging long before you hit the maximum rating. Smart buyers calculate their “effective load” by adding up their equipment weight and then multiplying by 1.5 to account for dynamic stress and future additions. Better yet, look for trays with reinforced front and rear edges that prevent the “smile” sag that plagues cheaper designs after six months of use. Remember: a sagging tray is worse than no tray at all because it creates new clearance issues and looks terrible.
Dimensional Intelligence: Measuring for Success
The “one-size-fits-most” approach fails spectacularly with cable trays. You need three critical measurements: desk depth (front to back), available clearance (desk underside to your knees), and width allocation (how much horizontal space you can dedicate). Standard trays range from 12-36 inches wide, with depths from 4-8 inches. A 17-inch depth tray on a 24-inch deep desk leaves inadequate knee clearance. Conversely, a shallow 4-inch tray on a deep executive desk might not contain your power strips. Pro tip: Measure your tallest power adapter and add two inches—that’s your minimum tray depth requirement. For width, plan on dedicating at least 60% of your desk’s width to the tray for balanced aesthetics.
Mounting Mechanisms: The Foundation of Longevity
The attachment system determines both installation ease and long-term reliability. Clamp mounts offer tool-free installation and preserve desk warranties but may slip on desks thinner than 1 inch or thicker than 2.5 inches. Screw-mounted brackets provide bulletproof security but require drilling and void furniture warranties—problematic for corporate environments or expensive desks. Adhesive options work for lightweight plastic trays but fail catastrophically when overloaded or exposed to temperature fluctuations. The hybrid approach—clamp brackets with optional screw reinforcement—gives you maximum flexibility. Always verify your desk’s construction: hollow-core desks need special toggle anchors, while solid wood can handle any mounting style.
Ventilation: The Invisible Performance Factor
Heat kills electronics and creates fire risks. Mesh designs naturally excel here, but even solid trays should feature perforated bottoms or side vents. The critical metric is air gap—quality designs maintain at least 0.5 inches of clearance between the tray bottom and your desk surface to allow convective airflow. Some premium trays integrate active cooling considerations with channels that align with power strip ventilation holes. If you’re running high-wattage equipment like gaming PCs, multiple monitors, or production gear, treat ventilation as a non-negotiable feature. Trapped heat not only reduces equipment lifespan but can cause thermal throttling that impacts performance.
The Installation Masterclass
Essential Tools and Pre-Installation Prep
Before you unbox anything, gather your actual cables, power strips, and adapters. Lay them out and group by function: permanent (monitors, desktop), frequent (laptop charger, phone), and occasional (external drives, accessories). This inventory prevents mid-installation surprises. Your toolkit should include a stud finder (for solid desk verification), a flashlight, zip ties or Velcro straps, cable labels, and a smartphone camera to photograph existing connections before disconnecting. For screw-mounted installations, a cordless drill with depth stop prevents drilling through your desktop. Most quality trays include basic hardware, but upgrading to premium screws with locking washers prevents loosening from vibration.
The Step-by-Step Professional Installation Process
Start by positioning the empty tray under your desk while seated to ensure zero knee interference. Mark bracket locations with painter’s tape, never permanent marker. Install brackets loosely first, then attach the tray and verify level before final tightening. The cable routing sequence matters: begin with power cables from the wall, route them through the tray first, then add data cables separately to avoid electromagnetic interference. Secure power strips to the tray bottom using dual-lock fasteners—not zip ties—so you can remove them without cutting. Leave service loops of 3-4 inches near connection points to allow for equipment adjustments. Finally, bundle cables loosely every 8-12 inches; over-tightening creates stress points and makes future changes difficult.
Common Installation Pitfalls That Ruin Results
The number one mistake? Installing too far forward. Your tray should sit at least 4 inches back from the desk front edge to remain invisible while seated. Second error: insufficient cable slack at connection points, creating tension that eventually pulls devices off desks. Third: mixing power and data cables in tight bundles, which can introduce interference in analog signals. Fourth: ignoring weight distribution—clustering heavy power supplies at one end creates torque stress on brackets. Fifth: failing to plan for future additions, resulting in a beautifully organized tray that’s completely full. Always leave 25% capacity for growth.
Advanced Cable Management Philosophy
The Art of Strategic Cable Bundling
Forget the Instagram-worthy tight coils that look clean but function poorly. Professional cable management prioritizes serviceability over aesthetics. Use the “highway system” approach: main power trunk lines run along the tray center, with exit ramps branching to devices. Bundle cables by function, not just proximity—keep all monitor cables together, all USB peripherals together. Use color-coded Velcro straps rather than zip ties: red for power, blue for data, green for audio. This visual coding lets you identify and modify specific cables without disturbing the entire system. Leave bundles loose enough to slide your hand through; compression damages cable insulation over time and creates electromagnetic coupling issues.
Power Strip Placement Strategy
Your power strip location determines tray effectiveness. Mount strips at the tray’s rear third, oriented so outlets face downward or sideways—never up, where gravity works against plug retention. For multiple strips, stagger them diagonally to maximize outlet access. Consider smart power strips with right-angle plugs; they reduce depth requirements by up to 2 inches. If you’re using a UPS, it belongs on the floor, not in the tray—the weight is excessive and batteries require ventilation. Instead, route UPS output cables through the tray. For international users or those with bulky adapters, look for trays with dedicated “brick bays”—recessed areas that accommodate oversized plugs without protruding.
Labeling Systems That Actually Work
Professional installations use printed heat-shrink labels or self-laminating wrap-around labels that remain legible for years. Consumer solutions work too: a Brother P-Touch label maker with flexible tape creates durable tags. Label both ends of every cable with device names, not just “Monitor 1” but “LG 27” Left Monitor." Include date of installation on power cables to track age for replacement cycles. For network cables, add the switch port number. This labeling transforms troubleshooting from a 20-minute archaeological dig into a 30-second targeted fix. Place labels 6 inches from each connector—close enough to see when tracing, far enough to avoid connector congestion.
Future-Proofing Your Cable Infrastructure
Technology evolves, and your cable management should accommodate that reality. Design your tray layout with “expansion corridors”—clear pathways where new cables can be added without disturbing existing bundles. Use modular cable managers that clip onto tray edges, providing additional routing options as needs grow. Install a small, empty junction box in the tray for future hub or switch additions. When selecting tray width, choose one that extends beyond your current equipment footprint by at least 6 inches on each side. This foresight costs nothing during installation but saves hours of reconfiguration when you upgrade to that ultrawide monitor or add a USB-C docking station.
Troubleshooting and Long-Term Maintenance
When Your “Organized” Cables Still Look Chaotic
If post-installation visuals disappoint, you’re likely dealing with excess cable length. The solution isn’t tighter bundling—it’s strategic coiling. Create loose service coils of excess cable within the tray, secured with Velcro so they can expand when needed. Position these coils at tray ends, away from high-traffic routing areas. Another common issue: cable cascade, where gravity pulls bundles downward, creating a visible drape. Solve this with intermediate support clips every 12 inches along the tray length. If cables escape the tray sides, your tray is undersized or you’re overloading it with too many bulky items. Consider a secondary, smaller tray for peripherals.
Dust Management and Cleaning Protocols
Cable trays are dust magnets, but mesh designs actually make cleaning easier. Quarterly maintenance should include vacuuming with a brush attachment while cables remain in place. For solid trays, use compressed air to blow debris out through cable entry points. Place a microfiber cloth at tray bottom as a dust catcher—remove and wash it monthly. For environments with pets, consider a fine mesh screen liner that prevents hair infiltration while maintaining ventilation. Never use liquid cleaners near power strips; instead, wipe power strips with a barely damp cloth while unplugged, and ensure they’re completely dry before restoring power.
Reconfiguring Without Starting Over
The true test of a cable management system is how it handles change. When adding a new device, resist the urge to shove cables in randomly. Instead, identify the nearest existing bundle traveling in that direction, attach the new cable with a Velcro strap, and route it through the same pathway. When removing equipment, cut labels off both ends but leave the cable in place if you might reuse it—labeled, coiled, and secured at the tray end. For major reconfigurations, photograph the existing layout, then remove only the affected bundles. Keep a “cable map” document on your phone showing which cables run where; this becomes invaluable during troubleshooting.
The Economics of Cable Management
Budget-Friendly vs. Premium: The Real Value Proposition
Entry-level trays ($15-30) use thinner gauge steel or basic plastics with simple clamp systems. They work adequately for lightweight setups with minimal equipment changes. Mid-range options ($35-60) offer better materials, reinforced construction, and more thoughtful mounting hardware—this is the sweet spot for most users. Premium trays ($70-150) feature modular designs, integrated power, exceptional build quality, and aesthetic finishes. The cost difference pays for itself in time saved during the first equipment change. Consider your total equipment value: if you’re protecting $2,000+ of gear, spending 3% of that on proper cable management is cheap insurance.
Features Worth Paying Extra For
Integrated grounding points justify premium pricing if you’re running sensitive audio or measurement equipment. Tool-less adjustment mechanisms save hours over the product’s lifespan. Powder coating quality matters—cheap paint chips and rusts, while premium finishes resist abrasion from cable movement. Look for trays with cable entry grommets that prevent abrasion; this protects cable insulation and extends lifespan. Modular accessories like clip-on holders for power bricks or headphone hangers add utility without clutter. Perhaps most valuable: lifetime warranties that include bracket replacement, signaling manufacturer confidence in engineering.
Calculating Long-Term ROI
Factor in time savings: if a $60 tray saves you 10 minutes monthly (conservative estimate) and your time is worth $50/hour, it pays for itself in 7.2 months. Add reduced equipment replacement from heat damage and cable stress, fewer trip hazards, and improved equipment resale value from pristine cables. The intangible benefits—reduced stress, professional appearance, faster troubleshooting—multiply the value. Most quality trays last through multiple desk upgrades, making them a one-time investment that migrates with you. Cheap trays that sag or fail within a year cost more in replacement and reinstallation time than buying right the first time.
Special Use Cases and Adaptations
Standing Desks and Height-Adjustable Workstations
These present unique challenges: cables must have enough slack to accommodate full height range without pulling, and tray weight affects motor strain. Choose trays specifically rated for standing desks, which feature cable chain compatibility and weight limits under 15 pounds. Mount trays to the moving desktop section, never the stationary base. Use coiled cable sleeves that extend and retract cleanly. For desks with crossbars, measure carefully—some trays mount between the bar and desktop, requiring specialized low-profile brackets. Always test full height range before final cable routing to ensure nothing binds or pulls taut at maximum extension.
Corner Desks and L-Shaped Configurations
Standard straight trays don’t play well with 90-degree angles. The professional solution uses two shorter trays meeting at the corner, with a corner bridge piece or flexible mesh section that allows cables to transition smoothly. Alternatively, mount a primary tray along the main work surface and use adhesive cable channels for the return section. For peninsula-style desks, consider a T-shaped configuration with the main tray along the back and a short extension forward for monitor cables. The key is maintaining accessible cable pathways without creating dead zones where cables get trapped. Measure the corner radius—some modern desks have curved corners that complicate mounting.
Gaming Setups vs. Professional Workstations
Gaming rigs demand more power, generate more heat, and change configurations frequently. They benefit from deeper trays (6+ inches) with excellent ventilation and easy access. RGB lighting controllers, multiple high-wattage power supplies, and frequent peripheral swaps favor modular systems with quick-release covers. Professional workstations prioritize stability, clean aesthetics for client calls, and often integrate UPS systems. They need shallower trays that don’t interfere with ergonomic keyboard trays, and may require EMI shielding for sensitive audio or video capture equipment. The crossover solution: a sturdy mesh tray with optional solid covers that can be added for professional settings and removed for gaming maintenance access.
Environmental and Sustainability Considerations
Eco-Friendly Materials and Manufacturing
Steel trays score high on recyclability—look for products using recycled content and powder coating processes that avoid VOCs. Some manufacturers now offer bamboo or recycled composite plastic trays that provide adequate strength with lower carbon footprints. Packaging matters too; trays shipped in minimal, recyclable materials reflect broader corporate sustainability values. For the ultimate green solution, consider modular aluminum systems that can be reconfigured infinitely without replacement, and whose manufacturing process is highly recyclable.
End-of-Life Planning
Quality trays should outlast your desk, but when upgrades happen, think circular. Steel and aluminum trays are universally recyclable through municipal programs. Plastic trays are trickier—check for type stamps (look for #2 HDPE or #5 PP that recycle easily) and avoid mixed-material products that can’t be separated. Some manufacturers offer take-back programs for responsible recycling. When disposing of old trays, strip any non-metal components first. Document your cable configurations before removal—this “as-built” documentation helps the next user and prevents perfectly good equipment from being discarded due to confusion.
Final Pre-Purchase Checklist
Before clicking “buy,” verify your desk’s construction and thickness with a simple knock test and ruler measurement. Inventory every cable and device you own, including that forgotten USB hub. Photograph your current setup from multiple angles to identify routing challenges. Check your chair’s height range to ensure knee clearance. Consider your future tech roadmap—are you planning a monitor upgrade or adding a Mac Studio? Finally, read installation manuals online before purchasing to confirm you’re comfortable with the process. A perfect tray that you can’t install correctly helps no one.
Frequently Asked Questions
How do I know if my desk is compatible with under-desk cable trays?
Most desks 0.75 to 2.5 inches thick work with clamp systems. For thinner glass or metal desks, adhesive or through-mount options exist. Solid wood, MDF, and particle board desks handle all mounting types. Check for structural crossbars or modesty panels that might interfere with bracket placement. When in doubt, choose a tray with multiple mounting options included.
Can cable trays support the weight of multiple power strips and bricks?
Yes, but capacity varies dramatically. Quality steel mesh trays support 20-30 pounds distributed evenly. The key is distribution—clustering 15 pounds of power supplies at one end causes sagging. Mount heavy items centrally and spread the load. For setups exceeding 25 pounds, consider two smaller trays or a solid steel industrial option rated for 50+ pounds.
Will installing a cable tray damage my desk or void its warranty?
Clamp mounts typically don’t damage desks or void warranties as they don’t penetrate the surface. Screw mounts always void warranties and risk cracking veneer or particle board if not done carefully. Many furniture manufacturers now specify approved mounting methods in their documentation. When warranty is a concern, choose premium clamp systems with rubberized pads that distribute pressure.
How much clearance do I need between the tray and my knees?
Minimum 4 inches of clearance prevents accidental knee strikes. Most users prefer 6-8 inches for comfortable leg crossing. Measure from your desk’s underside to your knee height while seated. Standard trays hang 3-5 inches below the desk surface. For low-clearance situations, look for “slim profile” trays that sit within 2 inches of the desk bottom.
What’s the best way to handle cables that are too long for the tray?
Avoid cutting cables—this voids warranties and creates future inflexibility. Instead, create loose service coils secured with Velcro straps within the tray. Position coils at tray ends or in dedicated “slack zones.” For extremely long cables, use a figure-8 coil pattern that prevents tangling and allows smooth payout when needed. Consider right-angle adapters to reduce effective cable length at connection points.
Can I install a cable tray on a standing desk that moves up and down?
Absolutely, but choose trays specifically designed for height-adjustable desks. These feature lighter weight (under 15 pounds loaded) and flexible cable routing that accommodates full range of motion. Mount the tray to the moving desktop section, never the stationary base. Use coiled cable sleeves or chain systems for cables running from desk to floor to prevent binding and ensure smooth operation.
How do I prevent dust from accumulating in my cable tray?
Mesh designs naturally shed dust better than solid trays. For solid options, line the bottom with a removable microfiber cloth that you can wash monthly. Use compressed air quarterly to blow out accumulated debris. Keep the area vacuumed, and consider placing an air purifier near your desk. In pet-friendly homes, add a fine mesh screen liner that blocks hair while allowing ventilation.
Is it better to use zip ties or Velcro straps for cable bundling?
Velcro straps win for 95% of applications. They’re reusable, allow easy cable additions, and don’t damage cable insulation. Use them loosely—bundles should compress no more than 20%. Reserve zip ties for permanent installations where cables will never change, and even then, use releasable zip ties. Never overtighten either type; crushed cables fail faster and perform poorly.
What should I do if my cables still look messy after installing a tray?
First, verify your tray isn’t undersized—overstuffed trays always look chaotic. Next, separate power from data cables to reduce visual clutter. Use cable sleeves or braided wraps for a unified appearance. Ensure cables enter and exit the tray at logical points rather than random locations. Finally, add a shallow cover or false bottom to conceal cables while maintaining access. Sometimes the issue is simply too many cables for one tray—consider a secondary small tray for peripherals.
How often should I reorganize or maintain my under-desk cable setup?
Perform a visual inspection quarterly and a hands-on review annually. Quarterly, check for sagging, loose straps, and dust buildup. Annually, unplug everything, vacuum thoroughly, inspect cables for wear, and reconfigure based on your current tech setup. If you add or remove major equipment, take the opportunity to optimize that cable’s routing. Well-designed systems require minimal maintenance—if you’re constantly fussing, your initial design needs improvement.