Whether you’re demonstrating intricate calligraphy techniques, unboxing the latest tech gadget, or walking viewers through a complex recipe, overhead tutorials have become the gold standard for visual instruction. The magic lies in that bird’s-eye perspective—allowing your audience to see exactly what your hands are doing without the awkward wrist gymnastics of holding a camera. But here’s the truth that separates amateur content from professional-quality productions: your overhead setup is only as good as the mount holding your webcam steady.
Choosing the right webcam mount isn’t just about convenience; it’s about transforming your creative workflow, eliminating frustrating vibrations, and ensuring your viewers stay focused on your content rather than a shaky, poorly-framed shot. This comprehensive guide dives deep into everything you need to know about selecting, installing, and optimizing the perfect overhead mounting solution for your tutorial videos—without the brand bias or affiliate-driven recommendations you’ll find elsewhere.
Top 10 Webcam Mounts for Overhead Tutorials
Detailed Product Reviews
1. Overhead Tripod Mount for Camera Webcam Ring Light, Flexible Over Head Arm for iPhone with Phone Holder and Ball Head, Table Stand Accessory for Phone Video Recording Live Stream
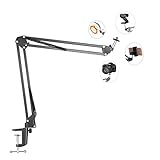
Overview: This versatile overhead mounting system provides a complete solution for content creators needing hands-free recording capabilities. The kit includes a flexible arm, C-clamp base, ball head, and phone holder, designed to support cameras, webcams, and smartphones for overhead video recording, live streaming, and online lessons.
What Makes It Stand Out: The universal 1/4-inch screw head delivers exceptional compatibility across devices, supporting everything from Logitech webcams to DSLRs and ring lights. The fully adjustable design allows precise positioning of the head, arm joints, and base, accommodating various shooting scenarios from baking tutorials to product demonstrations. The included phone holder features both side and bottom 1/4-inch screw holes for maximum flexibility.
Value for Money: At $19.98, this full kit represents excellent value compared to purchasing components separately. The metal construction supports up to 2 lbs, handling multiple phones or lightweight cameras. While some premium alternatives offer higher capacities, this price point makes professional overhead shots accessible to budget-conscious creators without sacrificing core functionality.
Strengths and Weaknesses: Strengths include universal compatibility, complete accessory kit, durable metal construction, and extensive adjustability. The C-clamp accommodates desks up to 1.8 inches thick. Weaknesses center on the 2-pound weight limit, which restricts use with heavier DSLR setups, and the basic metal finish may not match premium aesthetics. The assembly instructions could be more detailed for beginners.
Bottom Line: This overhead mount delivers outstanding versatility and value for smartphone and webcam users. It’s ideal for crafters, cooks, and online instructors who need reliable, adjustable overhead positioning without breaking the bank.
2. Camera Desk Mount Webcam Stand with Overhead Articulating Magic Boom Arm 1/4" Ball Head for DSLR Tripod, Adjustable Light Stand, Tabletop C Clamp for Ring Light Photo Video Shooting Live Streaming

Overview: This aluminum alloy overhead camera system targets serious content creators requiring robust support for heavier equipment. Featuring a two-section retractable stand and articulating boom arm, it provides professional-grade stability for DSLRs, LED panels, and ring lights in demanding shooting environments.
What Makes It Stand Out: The upgraded 40mm arm adapter significantly enhances load-bearing capacity compared to budget alternatives. Precision CNC-machined aluminum construction ensures durability and smooth operation. The integrated cold shoe mount on the phone holder allows simultaneous attachment of microphones or lights, while the C-clamp design with anti-slip silicone pads offers superior stability over traditional round bases.
Value for Money: Priced at $24.98, this stand bridges the gap between entry-level mounts and professional studio equipment. The 4.4-pound maximum capacity justifies the modest price increase over basic models, particularly for users with mirrorless cameras or heavier webcams. The inclusion of a cold shoe mount adds versatility typically found in more expensive systems.
Strengths and Weaknesses: Strengths include premium aluminum construction, impressive weight capacity, stable C-clamp base, cold shoe integration, and precise angle adjustments. The adjustable height range (12-22.4 inches) accommodates various setups. Weaknesses include variable load capacity depending on arm angle (1.1-2.2 lbs for overhead use), requiring careful balancing. The installation process demands attention to the manual to avoid equipment damage.
Bottom Line: This mount excels for creators using heavier cameras or needing maximum stability. The aluminum build and enhanced capacity make it worth the upgrade for professional applications, despite requiring more careful setup.
3. Overhead Camera Mount Desk Stand, Camera Arm Desk Mount Clamp Stand with 360°Adjustable Magic Arm, Webcam Arm Mount Stand w Ballhead Phone Mount for Desk Logitech Microphone Video Light Cell Phone

Overview: This budget-friendly overhead mounting solution offers essential functionality for light-duty applications. Combining a desk clamp, adjustable stand, and flexible holding arm, it provides basic overhead positioning for webcams, phones, and lightweight accessories in home studio environments.
What Makes It Stand Out: The multiple combination options allow users to configure the system as either a simple desktop stand or full overhead rig. The 360-degree ball head and adjustable arm adapter provide decent positioning flexibility. Its steel and ABS construction offers reasonable durability at the lowest price point in this category.
Value for Money: At $17.98, this is the most economical option reviewed, making overhead filming accessible to absolute beginners. However, the 0.5kg (1.1 lbs) maximum load severely limits compatibility with quality cameras or multiple accessories. It’s best viewed as a specialized phone/webcam mount rather than a versatile camera support system.
Strengths and Weaknesses: Strengths include affordability, basic adjustability, and inclusion of all necessary components. The C-clamp opens to 1.77 inches, fitting most desks. Weaknesses are significant: the minimal weight capacity restricts use to phones and the lightest webcams, the steel/ABS construction feels less premium than all-metal alternatives, and stability suffers with extended arm positions. The height adjustment mechanism can be finicky.
Bottom Line: This mount serves ultra-budget creators using only smartphones or lightweight webcams. For serious content production, invest in higher-capacity alternatives. It’s functional for basic overhead shots but lacks the robustness for professional use.
4. MagLoop Overhead Camera Mount with Ring Light, 6‘’ Overhead Phone Mount Compatible with iPhone Camera Webcam, Articulating Arm Phone Mount for YouTube Live Stream Cooking Nail Video Recording

Overview: This integrated solution combines an overhead mounting arm with a built-in 6-inch ring light, addressing both positioning and illumination needs for content creators. Designed specifically for top-down filming, it targets artists, crafters, and instructors who require consistent lighting and hands-free operation.
What Makes It Stand Out: The inclusion of a ring light with three color temperatures and ten brightness levels eliminates the need for separate lighting equipment. The 3-pound weight capacity exceeds many budget mounts, supporting phones and lightweight cameras securely. Tool-free installation and 360-degree unlimited rotation provide exceptional convenience for quick setup changes.
Value for Money: At $24.99, the ring light integration adds significant value, essentially bundling a $15-20 light with a capable mount. The USB-powered design offers flexible power options via power banks or laptop ports. While the 6-inch light diameter may be insufficient for large subjects, it’s ideal for close-up work like nail art or cooking demonstrations.
Strengths and Weaknesses: Strengths include integrated lighting solution, solid 3-pound capacity, wide device compatibility (4.0-6.5-inch phones), and easy clamp installation supporting surfaces up to 2 inches thick. The metal arm provides good stability. Weaknesses include the relatively small ring light diameter limiting coverage, USB power requirement (adapter not included), and basic construction that may not withstand heavy daily professional use.
Bottom Line: This hybrid mount-light combo excels for creators prioritizing convenience and integrated lighting. It’s perfect for beauty tutorials, crafting videos, and cooking content where consistent, close-up illumination is essential.
5. Upgrade Ring Light Overhead Camera Phone Mount for Desk, Evershop 10” Selfie Light with Stand Tripod for iPhone, Light with Phone Holder for Video Recording,Zoom Meeting,Live Streaming Tiktok,YouTube

Overview: This premium overhead system features a large 10-inch ring light combined with a robust mounting arm, targeting professional content creators who demand superior lighting quality. The high CRI rating and extensive adjustability make it suitable for product photography, detailed tutorials, and high-production-value streaming.
What Makes It Stand Out: The 10-inch ring light with 95+ CRI delivers exceptional color accuracy critical for skin tones, food photography, and craft documentation. Thirty lighting combinations (three color modes × ten brightness levels) provide precise control. The 30-inch cantilever arm offers exceptional reach, while the upgraded dual-spring metal mechanism maintains position even during extended shoots.
Value for Money: At $29.04, this represents the highest investment but delivers professional-grade lighting performance unmatched by competitors. The large ring light diameter and high CRI justify the premium over the MagLoop model. However, the USB power requirement and lack of included adapter mean additional costs for optimal brightness.
Strengths and Weaknesses: Strengths include superior 10-inch high-CRI ring light, extensive 30-inch arm reach, stable dual-spring adjustment, strong clamp supporting up to 2.4-inch surfaces, and comprehensive accessory package including cable clips. The lighting quality significantly enhances video production value. Weaknesses include the highest price point, USB power limitations (requires 10W+ adapter for full brightness), and larger footprint requiring more desk space.
Bottom Line: For creators serious about video quality, this is the top choice. The professional lighting and sturdy construction make it ideal for product reviews, makeup tutorials, and any content where color accuracy and even illumination are paramount.
6. UBeesize Overhead Phone Mount, Flexible Webcam Arm with Phone Holder and Ball Head, Overhead Tripod for Phone Drawing Live Streaming Cooking Flat Photography

Overview: The UBeesize Overhead Phone Mount offers a flexible solution for content creators needing hands-free phone positioning. This versatile arm system clamps to desks up to 2.5 inches thick and provides adjustable positioning for overhead shots, live streaming, and crafting videos. The integrated phone holder accommodates devices from 2.7 to 5.3 inches, covering most modern smartphones including the iPhone 15 and Samsung Galaxy S23 series.
What Makes It Stand Out: This mount’s triple-flexibility design allows independent adjustment of the phone holder, arm joint, and base, enabling precise angle optimization that many competitors lack. The inclusion of a 1/4" threaded tripod head significantly expands its utility beyond phones to webcams, ring lights, and action cameras. Notably, the manufacturer specifically highlights Magic: The Gathering gameplay as a use case, demonstrating thoughtful consideration of niche creator needs. The anti-slip serrate design with rubber padding provides superior phone protection compared to basic spring-loaded grips.
Value for Money: At $23.22, this mount sits in the sweet spot between budget clamps and professional rigs. It delivers webcam-grade versatility typically found in $30+ units while maintaining phone-first design priorities. The multi-device compatibility effectively replaces several single-purpose stands, offering excellent return on investment for hybrid creators who stream, film overhead content, and participate in video calls.
Strengths and Weaknesses: Strengths include exceptional flexibility, durable phone grip, broad compatibility, and space-saving design. The C-clamp base provides stable mounting without permanent installation. Weaknesses involve limited vertical reach compared to telescopic alternatives, potential arm drooping with heavier accessories, and plastic components that may degrade with heavy daily use. The clamp’s 2.5-inch maximum thickness excludes some modern desks.
Bottom Line: This UBeesize mount excels for creators prioritizing phone-based content and occasional webcam use. Its thoughtful design and competitive pricing make it ideal for crafting, cooking, and gaming content. While not robust enough for heavy DSLR setups, it’s a smart investment for streamers and hobbyist videographers seeking versatile, reliable phone positioning.
7. Heavy Duty Overhead Camera Desk Mount Stand 14.5"-41" with 1/4" Screw, 3-Section 360°Rotatable Detachable Articulating Boom Arm with Enlarged Handle C Clamp, Tabletop Light Stand for Streaming Vlog

Overview: The JEBUTU Heavy Duty Overhead Camera Mount targets serious content creators with its professional-grade aluminum construction and impressive 6.6-pound load capacity. This 3-section telescopic system extends from 14.5 to 41 inches, transforming from a compact desk mount to a substantial boom arm. The detachable pole design allows custom configuration for various shooting scenarios, from intimate unboxing videos to wide overhead cooking shots.
What Makes It Stand Out: This stand’s remarkable weight capacity—triple that of typical webcam mounts—enables support for DSLRs, video lights, and microphones simultaneously. The enlarged handle C-clamp offers superior convenience compared to knob-style adjusters, quickly securing to surfaces up to 1.96 inches thick while protecting furniture with integrated rubber pads. Each section’s 180-degree independent rotation creates true 360-degree positioning, allowing creators to fold the arm completely out of sight when not in use, a space-saving feature rare in this category.
Value for Money: At $29.98, this mount delivers premium features at a mid-tier price point. Competing products with similar load capacities often exceed $50, while cheaper alternatives can’t support professional equipment. The modular design effectively provides multiple stands in one, representing exceptional value for creators upgrading from phone-only to multi-equipment setups without requiring separate purchases.
Strengths and Weaknesses: Strengths include outstanding load capacity, versatile height adjustment, durable aluminum construction, and innovative folding storage. The handle-operated clamp excels for frequent repositioning. Weaknesses involve potential overkill for phone-only users, larger footprint than compact arms, and aluminum construction that may transmit vibrations more than padded alternatives. The 1.96-inch clamp limit restricts compatibility with extra-thick countertops.
Bottom Line: This JEBUTU stand is a workhorse for emerging professionals and dedicated hobbyists. Its robust construction and impressive capacity future-proof your setup for camera and lighting upgrades. While excessive for casual phone streamers, it’s an unbeatable value for creators building a versatile, equipment-heavy production rig.
8. JEBUTU 22" Magic Arm w Clamp, Overhead Phone Mount, Desk Camera Mount w Articulating Friction Boom Arm Thread Adapter, for Phone Video Light Webcam Microphone Action Camera Content Creators

Overview: The JEBUTU 22" Magic Arm presents a sophisticated articulating solution for creators demanding precision and stability. This friction-based boom arm features 1/4" screws on both ends and employs a unique anti-deflection deadbolt lock system that prevents rotational slippage—a common failure point in budget articulating arms. The package includes a versatile super clamp and multiple thread adapters, creating a complete mounting ecosystem for phones, webcams, lights, and microphones.
What Makes It Stand Out: The deadbolt lock mechanism sets this arm apart, physically securing connections against reverse deflection and ensuring equipment stays positioned even under vibration or weight shifts. Each joint features independent T-knob control over dual ball heads, providing granular adjustment unmatched by single-point tension systems. The super clamp’s rotatable rubber pads adapt to various mounting surfaces from desks to poles, while integrated 3/8" and 1/4" accessory threads enable expansion. Included adapters for 3/8" and 5/8" microphone mounts demonstrate exceptional compatibility foresight.
Value for Money: Priced at $24.37, this magic arm delivers professional-grade stability features typically found in $40+ cinema-grade equipment. The comprehensive adapter set eliminates separate purchases for microphone compatibility, while the anti-deflection design prevents costly equipment drops. For creators using Blue Yeti or similar microphones, the included adapters alone justify the price premium over basic arms.
Strengths and Weaknesses: Strengths include revolutionary anti-deflection security, independent joint control, premium aluminum construction, and exceptional adapter compatibility. The super clamp’s versatile gripping excels on irregular surfaces. Weaknesses involve a steeper learning curve for tension adjustment, the critical warning about non-detachable black knobs, and limited vertical reach compared to telescopic stands. The 22-inch length may prove restrictive for large-format overhead shots.
Bottom Line: This JEBUTU magic arm suits experienced creators prioritizing equipment security and precise positioning. Its anti-deflection technology provides peace of mind for expensive gear, making it ideal for permanent installations and vibration-prone environments. While beginners may prefer simpler systems, professionals will appreciate its robust engineering and comprehensive compatibility.
9. Ailight Overhead Camera Mount Desk Stand, 15.75"-33.45" Webcam Mount with 2-Section Adjustable Telescopic Boom Arm, C Clamp/Swiveling Ball Head for DSLR Camera, Phone, Ring Light, Webcam

Overview: The Ailight Overhead Camera Mount distinguishes itself through an innovative dual-arm architecture, combining a 3-section vertical pole with a separate 2-section horizontal boom. This hybrid design achieves heights from 15.75 to 33.45 inches while extending laterally from 11.8 to 20 inches, offering unparalleled positioning flexibility. Constructed from aviation-grade aluminum alloy with robust 18.6-25.7mm diameter tubing, it supports up to 2.2 pounds on the horizontal arm while maintaining stability for DSLRs, phones, and lights.
What Makes It Stand Out: The independent horizontal arm mounted via a fix clamp creates a true XY-axis positioning system unmatched by single-pole designs. This allows precise overhead framing without requiring the entire stand to be centered over the subject. Aviation aluminum construction provides professional durability and corrosion resistance, while the C-clamp accommodates desks from 0.2 to 1.97 inches thick. Both vertical and horizontal ball heads feature standard 1/4" screws, enabling simultaneous multi-device mounting that transforms this from a simple stand into a mini production rig.
Value for Money: At $38.69, this is the premium option in its class, justifying its price through unique dual-axis capability and aerospace-grade materials. While $10-$15 more than basic telescopic stands, it eliminates the need for separate horizontal extension arms. For creators requiring complex overhead angles—like technical drawing or multi-angle product shots—this design saves hours of repositioning time, delivering professional efficiency that hobbyists may not require but serious creators will value.
Strengths and Weaknesses: Strengths include revolutionary dual-arm flexibility, premium aviation aluminum construction, excellent stability, and wide desk compatibility. The independent horizontal arm excels for off-center compositions. Weaknesses involve the highest price point, the horizontal arm’s modest 2.2-pound limit restricting heavy camera-lens combinations, and a more complex setup process. The separate clamp mechanism adds setup time compared to integrated designs.
Bottom Line: The Ailight mount serves advanced creators needing sophisticated positioning beyond simple vertical adjustment. Its dual-arm system excels for technical demonstrations, art tutorials, and product photography requiring precise framing. While over-specified for basic streaming, it’s a worthwhile investment for professionals seeking production-grade flexibility in a compact footprint.
10. Phone Holder for Bed Desk, Flexible Camera Arm Desk Mount Clamp with Phone Holder and Ball Head, Overhead Tripod Mount for Camera Webcam Ring Light

Overview: This budget-conscious Phone Holder delivers remarkable versatility at an entry-level price point, accommodating desks up to 3.15 inches thick—surpassing most competitors. The flexible gooseneck arm features tension-adjustable knobs at each joint, supporting up to 3.3 pounds for phones, webcams, and lightweight cameras. A universal 1/4-inch threaded head and included phone holder clip (2.36 to 3.74 inches) enable immediate use with smartphones from 4 to 6.5 inches, plus compatibility with Logitech webcams and action cameras.
What Makes It Stand Out: The exceptional 3.15-inch clamp capacity accommodates thick countertops, headboards, and unconventional surfaces that exclude standard mounts. Integrated tension knobs on each gooseneck joint allow users to customize stiffness, preventing the sagging common in single-knob designs. The base features five mounting holes for bracket attachment, enabling vertical or horizontal clamp orientation. A protective sponge pad prevents furniture damage while the metal construction ensures durability uncommon in sub-$15 stands. The simultaneous-use ball head and phone holder facilitate mobile photography with supplementary lighting.
Value for Money: At $13.99, this mount redefines budget expectations, offering features typically found in $25+ units. The thick-desk compatibility alone justifies its price for many users, while the included accessories eliminate separate purchases. The 3.3-pound capacity exceeds many phone-focused competitors, providing headroom for small cameras or LED panels. For casual creators or those mounting to thick furniture, this represents exceptional value, though professionals will notice finish and precision differences from premium brands.
Strengths and Weaknesses: Strengths include unmatched clamp thickness capacity, adjustable joint tension, simultaneous multi-device mounting, and unbeatable price. The gooseneck design offers intuitive positioning. Weaknesses involve potential vibration transfer through metal construction, gradual joint loosening requiring periodic retightening, and aesthetic compromises typical of budget manufacturing. The 3.74-inch phone holder maximum may exclude large phablets with cases.
Bottom Line: This mount excels for budget-conscious users with thick desks or unconventional mounting needs. Its adjustable tension system provides reliable positioning for phones and webcams, making it perfect for bedside viewing, casual streaming, and basic overhead shots. While not suitable for professional camera gear, it’s an outstanding entry-level solution that punches well above its price class.
Why Overhead Webcam Setups Are Revolutionizing Online Tutorials
The overhead perspective has fundamentally changed how we consume instructional content. Unlike traditional face-to-camera vlogging, overhead tutorials create an intimate, immersive experience where viewers feel they’re looking directly over your shoulder. This positioning eliminates parallax issues, reduces visual distractions, and maintains consistent framing throughout your demonstration. But achieving this cinematic stability requires more than just propping your webcam on a stack of books. A dedicated mount system provides the precise positioning, vibration isolation, and reliability that serious content creators demand. The difference is immediately noticeable: professional-grade mounts eliminate the micro-movements and focus breathing that plague makeshift solutions, keeping your audience engaged with your content rather than distracted by technical shortcomings.
Understanding the Different Types of Webcam Mounts
Before diving into features and specifications, you need to understand the fundamental categories of overhead mounting systems. Each type serves different studio configurations, workflow requirements, and budget constraints. The wrong category choice will frustrate you daily, while the right one becomes an invisible partner in your creative process.
Articulating Arms vs. Fixed Booms: Which Is Right for You?
Articulating arms offer multiple pivot points, allowing you to reposition your camera with a simple push or pull. These are ideal for creators who frequently switch between overhead shots, face-to-camera segments, and side angles. The gas-spring mechanisms in premium models hold position without drift, while budget versions may sag over time. Fixed booms, conversely, provide a single, rigid extension with minimal adjustment. They excel in dedicated tutorial spaces where the camera position never changes, offering superior stability and zero sag. Your choice depends entirely on whether flexibility or rock-solid permanence better serves your content style.
Clamp-On Mounts: Maximizing Desk Space
Clamp-on systems represent the most popular solution for home studio creators working in multi-purpose spaces. These mounts attach to desk edges, shelves, or tabletops without permanent installation. The critical factor most buyers overlook is desk thickness compatibility—many clamps accommodate only 2-3 inches, while premium options handle up to 4.5 inches. Look for models with protective padding to prevent marring your furniture and dual-threaded inserts that allow both horizontal and vertical arm attachment. The best clamp-on mounts distribute weight across a wide surface area, preventing the wobble that comes from concentrating force on a small contact point.
Tripod-Based Solutions: Versatility Above All
Tripods with horizontal center columns or specialized overhead arms provide unmatched portability. You can collapse the entire setup and store it in minutes, making them perfect for creators working in shared spaces. However, this convenience comes with trade-offs: tripods occupy valuable floor space and require careful counterbalancing to prevent tipping. When evaluating tripod solutions, pay close attention to the minimum and maximum height specifications—many budget tripods don’t extend high enough for comfortable overhead positioning without raising your work surface uncomfortably.
Wall and Ceiling Mounts: The Permanent Studio Approach
For creators with dedicated studio space, wall and ceiling mounts offer the ultimate in stability and space efficiency. These systems eliminate desk clutter entirely and provide a completely vibration-free platform. Installation requires locating studs or using appropriate anchors, and you’ll need to plan cable routing before mounting. The investment in professional installation pays dividends in daily workflow efficiency—never again adjusting a sagging arm or bumping into a tripod leg. Consider these only if you’re certain about your camera placement, as repositioning requires significant effort.
Key Features That Separate Premium Mounts from Budget Options
Price differences in webcam mounts aren’t arbitrary—they reflect engineering quality that directly impacts your content. Understanding which features justify higher costs helps you invest wisely rather than overspending on unnecessary capabilities or underspending and replacing equipment prematurely.
Weight Capacity: The Foundation of Stability
Every mount specification includes a maximum weight rating, but seasoned creators know the “working load” is what matters. This is typically 60-70% of the stated maximum. A mount rated for 4 pounds might hold your 2-pound webcam and small LED panel, but operating near capacity accelerates joint wear and introduces micro-sagging. Premium mounts provide both maximum and recommended working load specifications. For overhead tutorials, choose a mount with a working load at least 30% higher than your total equipment weight—including future accessories you might add.
Reach and Extension: Capturing Your Full Workspace
Mounting arm length determines your framing flexibility. Measure your work surface diagonal, then add 6-8 inches for optimal camera positioning. Arms shorter than 24 inches restrict you to tight close-ups, while those exceeding 40 inches may develop noticeable bounce if not properly tensioned. The best designs feature adjustable friction at each joint, allowing you to fine-tune resistance based on extension length. Remember: longer reach requires more robust construction to maintain stability, so don’t sacrifice rigidity for extra inches.
Build Materials: Why Metal Beats Plastic Every Time
Budget mounts often use reinforced plastic joints to cut costs, but these degrade under constant tension and temperature fluctuations. Aluminum alloy provides the sweet spot of strength, weight, and cost—resisting corrosion while remaining light enough for clamp-on applications. Steel components belong in permanent installations where weight isn’t a concern but maximum rigidity is. Examine product descriptions for terms like “die-cast” or “CNC-machined,” which indicate precision manufacturing versus injection-molded parts. The threads where your webcam attaches should always be metal; stripped plastic threads render the entire mount useless.
Cable Management: The Unsung Hero of Clean Tutorials
Nothing screams amateur production like cables dangling in frame or getting snagged during adjustments. Integrated cable channels or clips keep USB and power cords routed along the mount arm, invisible to your camera. Premium systems offer removable covers that completely conceal cables, while budget options provide simple adhesive clips. Consider how many cables you need to route—webcam USB, microphone, LED light power, and any other peripherals. The best mounts accommodate at least three separate cables without binding or affecting joint movement.
The Critical Role of Stability and Vibration Dampening
Stability transcends simple sturdiness—it’s about isolating your camera from environmental vibrations. Footsteps, typing, HVAC systems, and even passing traffic transmit through floors and walls to your mount. Quality systems incorporate vibration-dampening features like rubber isolation washers, weighted bases, or tensioned spring systems that absorb rather than transmit movement. Test stability by gently tapping your desk while monitoring your camera feed; any visible shake indicates inadequate isolation. For overhead tutorials where viewers scrutinize fine details, even imperceptible vibrations during recording become glaringly obvious in the final footage.
Adjustability: Flexibility for Multi-Angle Content Creation
The best tutorial creators vary their shots to maintain visual interest. Your mount should enable smooth transitions from full-workspace establishing shots to extreme close-ups without requiring tool adjustments. Look for tool-less tension knobs that allow on-the-fly changes and indexed rotation points that return to exact positions. Some advanced mounts include memory locks that let you preset and instantly recall specific angles. Consider the range of motion at each joint: 360-degree rotation is standard, but 180-degree tilt range proves more valuable for overhead work. The ability to quickly flip between horizontal and vertical orientation opens up smartphone filming options without a separate rig.
Compatibility Considerations: Will Your Webcam Actually Fit?
Mounting standards exist for a reason, but not all webcams follow them. Before purchasing any system, verify your camera’s mounting interface and the mount’s compatibility.
Standard Thread Sizes Explained
The vast majority of webcams and cameras use a 1/4"-20 UNC thread (one-quarter inch diameter, 20 threads per inch). This standard has remained unchanged for decades, ensuring cross-compatibility. Some action cameras and smartphone adapters use 3/8"-16 threads, while professional video equipment may employ 5/8" spigots. Quality mounts include removable adapters that accommodate multiple standards. Check whether the mount’s threaded insert is countersunk—this prevents your webcam from wobbling on an improperly seated screw and protects the camera’s mounting point from stress damage.
Adapter Solutions for Non-Standard Equipment
If your webcam uses a proprietary mount (common with all-in-one conference cameras), you’ll need an adapter plate. These range from simple L-brackets to multi-hole mounting cheese plates that provide infinite positioning options. When using adapters, always calculate the added weight and potential leverage effects. An adapter that positions your camera several inches from the mount’s centerline effectively increases the load on the arm, potentially exceeding the working capacity. The best approach is minimizing the distance between mount and camera using low-profile adapters.
Installation Insights: From Temporary to Permanent Setups
Proper installation determines whether your mount performs as designed or becomes a source of constant frustration. Each mounting type requires specific considerations that manufacturers rarely emphasize in marketing materials.
Desk Thickness and Mounting Surface Requirements
Clamp-on mounts need flat, parallel surfaces to grip effectively. Measure your desk’s edge thickness at multiple points—many modern desks taper, creating uneven pressure. For desks with lips or beveled edges, look for mounts with adjustable jaw angles or protective shims that create a flush contact surface. The clamping force should distribute across at least 2 square inches; narrow clamps concentrate pressure and can damage softer woods or composite materials. If your desk has a glass top or fragile finish, consider a through-desk grommet mount that eliminates edge clamping entirely.
Tools You’ll Need for Proper Installation
Even “tool-less” mounts benefit from proper assembly. Keep a torque wrench handy to tighten bolts to manufacturer specifications—over-tightening strips threads while under-tightening invites drift. A stud finder proves invaluable for wall mounts, while a small level ensures your arm doesn’t introduce a subtle tilt to your footage. For cable management, a fish tape or wire coat hanger helps route cords through internal channels. Keep thread-locking compound (medium strength) available for permanent installations; this prevents vibration from loosening critical joints without making future disassembly impossible.
Lighting Integration: Mounting Your Illumination Source
Overhead camera positioning creates unique lighting challenges—your body or the mount itself can cast shadows on your work surface. The solution is integrating lighting mounts into your camera support system. Look for arms with secondary mounting points or accessory brackets that position LED panels at 45-degree angles to your subject. Some advanced systems feature cold shoe mounts or 1/4"-20 threaded bosses along the arm length. When calculating weight capacity, include your lighting equipment; a small LED panel and diffuser can add 1-2 pounds. The ideal setup positions lights slightly forward of the camera, eliminating shadows while keeping fixtures out of your wide-angle shots.
Ergonomics and Workflow Optimization
Your mount should enhance your creative process, not complicate it. Consider how the mount’s position affects your ability to reach your work area comfortably. Arms that swing completely out of the way when not in use preserve your desk’s functionality for non-filming tasks. The height of your mounted camera should allow you to sit or stand naturally without hunching—typically 18-24 inches above your work surface. Pay attention to knob and lever placement; you shouldn’t need to stretch or use tools for daily adjustments. Some creators prefer mounts with remote-controlled pan/tilt heads for micro-adjustments without disrupting their workflow, though these add complexity and potential failure points.
Budget Planning: What to Expect at Different Price Points
Entry-level mounts ($20-40) use plastic joints and offer limited reach, suitable for lightweight webcams in static positions. Mid-range options ($50-100) provide aluminum construction, better tension control, and integrated cable management—the sweet spot for most serious tutorial creators. Premium mounts ($100-200) feature steel reinforcement, precision machining, and professional-grade stability for heavy camera/lighting combos. Beyond $200, you’re paying for brand reputation, extreme weight capacity, or specialized features like motorized positioning. Allocate 20-30% of your total webcam budget to the mount; a $200 camera on a $20 mount produces worse results than a $100 camera on a quality support system.
Common Mistakes to Avoid When Setting Up Your Overhead Mount
First, never mount directly to drywall without locating studs—the weight of even a small webcam will eventually pull anchors loose, damaging your wall and destroying your camera. Second, avoid over-extending arms without counterbalancing; this creates a lever effect that stresses joints and invites catastrophic failure. Third, don’t ignore cable strain relief—USB connectors can loosen with constant movement, causing intermittent disconnections that ruin recordings. Fourth, resist the temptation to “max out” your mount’s extension; operating at 80% of maximum reach provides better stability and longevity. Finally, never assume your mount is level—always verify with a test recording, as even a 2-degree tilt becomes disorienting over a 20-minute tutorial.
Maintenance and Longevity: Protecting Your Investment
A quality mount should last years, but only with proper care. Every six months, disassemble adjustable joints and clean out dust that acts as abrasive material. Apply a single drop of machine oil to friction surfaces—never use WD-40, which attracts debris. Check all threaded connections for loosening due to vibration, and reapply thread locker if necessary. For clamp-on mounts, inspect protective pads for compression; flattened pads reduce grip and can scratch surfaces. Store the mount in a neutral position when not in use for extended periods—leaving it fully extended stresses springs and seals. Document your most-used positions with photos or measurements; this speeds up setup when switching between project types.
Frequently Asked Questions
What’s the ideal height for an overhead webcam mount?
The optimal height is 18-24 inches above your work surface, measured from the camera lens to your subject. This range provides sufficient field of view for most tutorials while keeping your camera close enough to capture fine details. If you’re filming small objects like jewelry or electronics repair, 12-16 inches works better. Always test your specific lens focal length—wide-angle webcams can be positioned higher, while standard lenses need to be closer to avoid cropping.
Can I use a DSLR or mirrorless camera on a webcam mount?
Only if the mount’s weight capacity exceeds your camera’s weight by at least 50%. Most webcam mounts support 2-4 pounds, while even lightweight mirrorless setups with lenses weigh 1.5-2 pounds. The leverage effect of a longer camera body also stresses joints more than a compact webcam. If you must use a larger camera, opt for a mount rated for 6+ pounds and position the camera directly over the mount’s center column rather than at full arm extension.
How do I prevent my mount from sagging over time?
Sagging results from either inadequate initial tension or worn friction components. When installing, tighten adjustment knobs firmly using the “two-finger rule”—if you can turn it with just thumb and index finger, it’s too loose. Premium mounts include internal springs that can be re-tensioned as they wear. For non-adjustable models, disassemble the joint and add a thin nylon washer to increase friction. Never exceed the recommended working load, as this accelerates wear exponentially.
Will a clamp-on mount damage my desk?
Quality clamps with wide contact surfaces and thick protective pads won’t damage most desk materials when properly installed. The risk increases with narrow clamps, overtightening, and soft woods like pine. For glass, lacquered, or antique surfaces, use a backing plate (a thin wood board) between the clamp and desk to distribute pressure. Check the clamp monthly for indentation; if you see any, immediately relieve pressure and add additional padding.
What’s the best way to manage cables on an overhead mount?
Route cables along the arm’s interior channels first, securing them every 6 inches with Velcro straps (never zip ties, which must be cut for adjustments). Leave a service loop of 3-4 inches at each joint to allow free movement without pulling connectors. Use gravity to your advantage—run cables downward from the camera, not upward from the base, to prevent strain. For external routing, spiral wrap provides the cleanest appearance while allowing easy cable removal.
Can I install an overhead mount on a glass desk?
Glass desks present unique challenges. Avoid edge clamps entirely, as tempered glass edges are vulnerable to stress fractures. Instead, use a through-desk grommet mount that secures through a pre-drilled hole (most glass desks have cable management holes). If you must use a clamp, place a 1/4-inch plywood backing plate on both sides of the glass to distribute pressure, and never exceed the clamp’s minimum tension setting. Monitor the glass regularly for stress cracks.
How do I eliminate shadows when using an overhead mount?
Shadows occur when your light source, body, or mount interferes with illumination. Use two light sources positioned at 45-degree angles from opposite sides of your work area. Mount lights slightly forward of the camera on separate arms to keep them out of wide shots. For deep objects, add a small fill light at a low angle to eliminate shadows cast by your hands. Matte white surfaces on your desk reflect light upward, naturally filling shadows without additional equipment.
Is it better to have a longer arm or a taller main pole?
For most setups, a taller main pole provides better stability than an excessively long arm. A 30-inch pole with a 20-inch arm offers superior rigidity to a 15-inch pole with a 35-inch arm, assuming the same total height. The arm’s horizontal leverage creates more stress than vertical extension. If you need both height and reach, choose a mount with a reinforced main column (at least 1.5-inch diameter) and limit arm extension to 60% of its maximum length during normal use.
How often should I replace my webcam mount?
A quality metal mount should last 5-10 years with proper maintenance. Replace it when you notice persistent sagging that can’t be corrected by re-tensioning, visible metal fatigue (cracks or deformation), or stripped threads. Plastic components may degrade faster—inspect them annually for brittleness or cracking. If you upgrade to significantly heavier equipment, replace the mount rather than pushing it beyond its design limits. A mount failure can destroy expensive cameras and injure you during a tutorial.
Can I use multiple cameras with one overhead mount?
Yes, but requires careful planning. Use a multi-camera mounting plate (cheese plate) that attaches to your main mount, providing multiple 1/4"-20 mounting points. Position your primary camera centered over the work area and secondary cameras at the edges for alternative angles. Calculate the combined weight against your mount’s capacity, remembering that offset positioning increases effective load. For dynamic switching between cameras, consider a mount with a quick-release system that lets you swap cameras without tools, though this adds setup time between shots.