Podcasting has evolved from a niche hobby into a hyper-competitive content arena where audio quality separates the amateurs from the professionals. As we navigate 2026, listeners have developed ruthlessly discerning ears, thanks to improved playback devices and AI-enhanced streaming platforms that expose every sibilance, room reflection, and background hum. Your microphone isn’t just equipment—it’s your voice’s ambassador to the world. While dynamic microphones have their place, condenser microphones continue to reign supreme for podcasters seeking that coveted broadcast-quality intimacy and detail that makes audiences feel like you’re speaking directly to them.
The landscape has shifted dramatically in recent years. We’re seeing microphones that think for themselves, interfaces that auto-calibrate to your voice, and USB-C connectivity that’s finally reached professional-grade stability. But with this technological leap comes overwhelming choice and marketing noise that can paralyze even seasoned creators. This guide cuts through the hype, focusing on what actually matters when selecting a condenser microphone for your specific podcasting needs—whether you’re recording solo monologues in a treated studio or capturing on-the-road interviews in unpredictable environments.
Top 10 Condenser Microphones for Podcasters
Detailed Product Reviews
1. MAONO Microphone with Studio Headphone Set 192kHz/24bit Vocal Condenser Cardioid Podcast Mic Compatible with Mac and Windows, YouTube, Gaming, Live Streaming, Voice-Over (AU-A04H)

Overview: The MAONO AU-A04H is an all-in-one recording solution combining a USB condenser microphone with dedicated studio headphones, targeting podcasters, streamers, and content creators seeking a complete audio setup. This bundle eliminates compatibility guesswork, offering professional-grade specifications at an accessible price point with everything needed for immediate deployment.
What Makes It Stand Out: The integrated studio headphones feature proprietary 50mm large-aperture drivers with active noise reduction—a rarity in sub-$100 kits. The microphone boasts a professional 192kHz/24bit resolution chipset and 16mm electret condenser transducer, delivering broadcast-quality audio across a 30Hz-16kHz frequency response. The magnet ring on the USB cable reduces electromagnetic interference, ensuring clean signal transmission.
Value for Money: At $99.99, purchasing these components separately would cost 30-40% more. The package includes the microphone, headphones, and 3.5mm/6.35mm adapters for immediate compatibility with PCs, laptops, smartphones, and tablets. Compared to entry-level Blue Yeti bundles, this offers higher sampling rates and dedicated monitoring headphones at a competitive price point.
Strengths and Weaknesses: Pros: Complete plug-and-play solution; high-resolution audio capture; versatile compatibility; noise-canceling headphones enhance monitoring. Cons: Headphones lack premium build quality; USB connectivity limits future upgrades; no included boom arm or pop filter reduces positioning options.
Bottom Line: The AU-A04H delivers exceptional convenience for beginners wanting a one-box solution. If you need both a microphone and monitoring headphones without researching compatibility, this bundle offers genuine value and performance that punches above its weight class.
2. USB Microphone, MAONO 192KHZ/24Bit Plug & Play PC Computer Podcast Condenser Cardioid Metal Mic Kit with Professional Sound Chipset for Recording, Gaming, Singing, YouTube (AU-A04)

Overview: The MAONO AU-A04 is a streamlined USB microphone kit delivering professional audio specifications without the premium price. Designed for creators prioritizing microphone performance, this package includes essential accessories for high-quality recording, streaming, and voice-over work in a single, affordable bundle.
What Makes It Stand Out: This kit includes a robust scissor arm boom stand with shock mount, pop filter, and foam windscreen—accessories typically sold separately. The same 192kHz/24bit professional chipset powers the 16mm electret condenser capsule, ensuring studio-quality sound. The double-shielded USB cable with anti-interference magnet ring enhances signal integrity in electrically noisy environments.
Value for Money: At $54.99, this represents one of the most comprehensive microphone kits available. Competing products like the Blue Snowball iCE lack the included boom arm and shock mount, requiring additional $30-50 investments. The all-metal arm construction and professional-grade accessories make this an unbeatable entry-point package for serious beginners.
Strengths and Weaknesses: Pros: Exceptional accessory bundle; high-resolution audio; sturdy metal boom arm; plug-and-play simplicity; double-shielded cable. Cons: No included headphones for monitoring; requires OTG adapter for mobile use; plastic shock mount components may wear; cardioid pattern only.
Bottom Line: For budget-conscious creators wanting professional results, the AU-A04 is the definitive choice. The included boom arm and accessories justify the price alone, making this the smartest starting point for YouTube, podcasting, and home studio recording without compromise.
3. LUORNG Condenser Microphone Holder Standard Interface Thread Compatible with Stand Devices With 3/8 Conversion Nut Short Video Mic Clip Ferrule For 0.9-inch Portable Shockproof Microphone Stands

Overview: The LUORNG microphone holder is a specialized mounting accessory for content creators needing flexible microphone positioning. This simple device solves thread compatibility issues between microphones and stands, offering 270 degrees of rotational adjustment for optimal placement in home studios and portable recording setups.
What Makes It Stand Out: The inclusion of both M16 female thread and a 3/8 conversion nut provides exceptional versatility, accommodating various microphone stands and boom arms found in consumer and pro audio environments. The 270-degree circular motion allows precise angling for microphones with protruding threads that standard mounts cannot accommodate. Its specific 22mm/0.9-inch diameter compatibility targets popular portable condenser mics.
Value for Money: At $7.99, this accessory delivers significant utility for minimal investment. Comparable thread adapters from pro audio brands like K&M cost $15-25, making this economical. For creators who’ve purchased microphone bundles with incompatible stands, this eliminates replacing entire mounting systems, saving money and desk space.
Strengths and Weaknesses: Pros: Extremely affordable; versatile thread conversion; smooth 270-degree rotation; durable metal construction; solves compatibility issues. Cons: Extremely niche—only useful for specific microphone dimensions; no microphone or stand included; limited to 22mm diameter mics; basic finish may not match premium setups.
Bottom Line: This holder serves a very specific but valuable purpose. If you own a 0.9-inch condenser microphone with thread compatibility issues, it’s an essential, cost-effective fix. However, most users purchasing complete kits won’t need this standalone accessory.
4. RØDE NT1 Signature Series Large-Diaphragm Condenser Microphone with Shock Mount, Pop Filter and XLR Cable for Music Production, Vocal Recording, Streaming and Podcasting (Black)
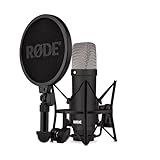
Overview: The RØDE NT1 Signature Series represents the pinnacle of large-diaphragm condenser microphone technology, engineered for discerning creators demanding uncompromising audio fidelity. This Australian-made microphone sets new standards for self-noise performance while delivering warm, detailed character that defines professional vocal recordings across music and spoken word.
What Makes It Stand Out: With self-noise of just 4dBA, the NT1 is the world’s quietest studio condenser microphone, capturing subtle vocal nuances without electronic hiss. The HF6 1-inch true condenser capsule provides smooth, extended frequency response with exceptional SPL handling. The premium package includes a studio-grade shock mount, pop filter, and XLR cable for immediate professional deployment.
Value for Money: At $159, the NT1 undercuts competitors like the Neumann TLM 102 by hundreds while delivering comparable noise performance. The included accessories represent $80-100 in value, and the industry-leading 10-year warranty ensures long-term reliability. For project studios and serious podcasters, this is a lifetime investment that appreciates over time.
Strengths and Weaknesses: Pros: Unmatched low-noise performance; exceptional build quality; premium accessories included; 10-year warranty; made in Australia. Cons: Requires XLR interface and phantom power; higher initial cost; overkill for casual users; fixed cardioid pattern only.
Bottom Line: The NT1 Signature Series is a professional-grade tool that justifies every penny. If you’re committed to audio excellence and have supporting equipment, this microphone will elevate your productions to commercial standards. It’s an investment, not an expense.
5. FIFINE Studio Condenser USB Microphone Computer PC Microphone Kit with Adjustable Boom Arm Stand Shock Mount for Instruments Voice Overs Recording Podcasting YouTube Vocal Gaming Streaming-T669

Overview: The FIFINE T669 is an ultra-affordable USB microphone kit designed to democratize quality audio recording for absolute beginners. This comprehensive bundle removes every barrier to entry, providing a complete streaming and podcasting setup at a price point that competes with basic standalone microphones while including professional positioning accessories.
What Makes It Stand Out: At under $40, including a scissor arm boom stand, shock mount, and double-layer pop filter, the T669 eliminates additional purchases. The USB output offers true plug-and-play operation across Windows, macOS, and Linux without driver installation. The 180-degree vertical and 135-degree horizontal arm adjustment provides professional positioning flexibility rarely seen in this price class.
Value for Money: Priced at $39.99, this is arguably the best value in USB microphone kits. Competing products like the Blue Snowball cost more while lacking the boom arm and shock mount. The included 8.2ft USB cable and all-steel arm construction deliver durability that defies the budget price. For streamers and YouTubers starting from zero, this is the most cost-effective complete solution available.
Strengths and Weaknesses: Pros: Unbeatable price; complete accessory bundle; easy setup; adequate audio quality for beginners; sturdy metal arm. Cons: Audio fidelity doesn’t match premium mics; plastic shock mount feels cheap; no monitoring headphone jack; incompatible with Xbox; limited frequency response transparency.
Bottom Line: The T669 is the perfect starter kit for hobbyists and aspiring creators with minimal budget. While it won’t satisfy audiophiles, it delivers remarkably functional results for the price. If you’re testing the waters of content creation, this is your risk-free entry point.
6. Audio-Technica AT2020 Cardioid Condenser Studio XLR Microphone, Ideal for Project/Home Studio Applications, Black
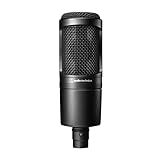
Overview: The Audio-Technica AT2020 has established itself as the industry benchmark for affordable studio condenser microphones. This side-address XLR microphone delivers professional-grade audio capture for home studio enthusiasts, podcasters, and musicians seeking broadcast-quality sound without breaking the bank. Its cardioid polar pattern focuses on your intended sound source while rejecting off-axis noise.
What Makes It Stand Out: The AT2020’s exceptional SPL handling and wide dynamic range allow it to record everything from delicate vocals to screaming guitar cabinets without distortion. The custom-engineered low-mass diaphragm provides extended frequency response and superior transient response that rivals mics costing twice as much. Audio-Technica’s legendary build quality ensures this microphone will survive years of studio use.
Value for Money: At $119, the AT2020 represents outstanding value for serious creators. While cheaper alternatives exist, none match its proven track record and sonic performance. This microphone holds its value exceptionally well and eliminates the need for immediate upgrades as your skills progress. It’s an investment that pays dividends in professional results.
Strengths and Weaknesses: Pros: Exceptional audio clarity, robust all-metal construction, handles high sound pressure levels effortlessly, minimal self-noise, and trusted brand reputation. Cons: Requires separate 48V phantom power source/audio interface (not included), lacks included accessories like shock mount or pop filter, and has a slightly harsh high-end that may need EQ for some voices.
Bottom Line: The AT2020 remains the gold standard for home studio microphones under $150. If you’re serious about audio quality and already own an audio interface, this is the smartest purchase you can make. It delivers professional results that will elevate your productions immediately.
7. MAONO XLR Condenser Microphone, Professional Cardioid Studio Recording Mic for Streaming, Podcasting, Singing, Voice-Over, Vocal, Home-Studio, YouTube, Skype, Twitch (PM320S)

Overview: The MAONO PM320S is a budget-conscious creator’s dream package, bundling a solid XLR condenser microphone with every essential accessory needed to start recording immediately. This all-metal microphone targets entry-level podcasters, streamers, and musicians who want professional connectivity without the typical piecemeal purchasing process.
What Makes It Stand Out: Unlike bare-bones microphones, the PM320S includes a complete studio kit: boom arm, shock mount, pop filter, windscreen, and XLR cable. The 16mm condenser capsule delivers respectable frequency response and transient handling that punches above its weight class. The full metal construction feels substantial and professional, not plasticky like many competitors at this price.
Value for Money: At just $50.39, this package is remarkably affordable. Purchasing these accessories separately would easily exceed $100. The microphone itself performs adequately for voice work and acoustic instruments, making it an unbeatable starter kit. While it won’t match premium mics, the included accessories alone justify the price.
Strengths and Weaknesses: Pros: Complete all-in-one package, sturdy metal build quality, effective shock mount and pop filter, excellent beginner value, and low self-noise. Cons: Requires 48V phantom power (not included), less detailed high-frequency response than premium mics, boom arm could be more robust, and brand lacks Audio-Technica’s legacy.
Bottom Line: The MAONO PM320S is the ultimate budget entry point into XLR microphones. If you need everything to get started and want to minimize initial investment, this bundle is unbeatable. Perfect for beginners who prioritize functionality and value over audiophile-grade performance.
8. FIFINE USB Microphone, Metal Condenser Recording Microphone for MAC OS, Windows, Cardioid Laptop Mic for Recording Vocals, Voice Overs, Streaming, Meeting and YouTube Videos-K669B

Overview: The FIFINE K669B strips away complexity to deliver plug-and-play simplicity for creators who want decent audio without technical hurdles. This USB condenser microphone connects directly to computers and PS4/PS5, eliminating the need for audio interfaces or phantom power. It’s designed for streamers, remote workers, and casual content creators prioritizing convenience.
What Makes It Stand Out: The integrated volume knob provides real-time level control—a rare feature at this price point. Its solid metal construction and included tripod stand offer unexpected durability for a $24 microphone. The cardioid pattern effectively reduces keyboard and room noise, while the 5.9-foot USB cable provides flexible positioning.
Value for Money: At $23.99, the K669B is nearly disposable yet performs respectably. It’s cheaper than most gaming headsets while delivering superior vocal clarity. For casual Zoom calls, YouTube voiceovers, or streaming hobbyists, the cost-to-performance ratio is exceptional. You won’t find better audio quality for less money.
Strengths and Weaknesses: Pros: Extremely affordable, true plug-and-play operation, durable metal body, convenient volume control, no external power needed, and wide OS compatibility. Cons: USB connection limits upgrade paths, fixed cable reduces flexibility, tripod stand picks up desk vibrations, not suitable for professional music recording, and lacks fine detail in vocal reproduction.
Bottom Line: The FIFINE K669B is perfect for beginners and casual users who want better-than-headset audio without complexity or cost. If you’re starting your content creation journey or need a reliable mic for remote work, this delivers remarkable value. Don’t expect studio quality, but it’s more than adequate for most non-professional applications.
9. Tascam TM-80 Large Diaphagm Condenser Microphone,Silver

Overview: The Tascam TM-80 brings decades of professional audio engineering heritage to the budget home recording market. This large-diaphragm XLR condenser microphone features an 18mm aluminum capsule designed to capture vocals and acoustic instruments with warmth and clarity. It bridges the gap between entry-level mics and professional studio equipment.
What Makes It Stand Out: The TM-80’s internal circuitry is optimized for low noise and distortion, preserving clean signal integrity. Its impressive 136dB SPL handling allows close-miking loud sources like guitar amps and drums without clipping. The package includes a quality elastic shock mount and six-foot XLR cable—accessories often omitted by competitors.
Value for Money: Priced at $49, the TM-80 competes directly with budget champions while offering Tascam’s trusted name. The included shock mount ($20+ value) and cable make this an even better deal. It delivers 80% of the performance of $200+ mics at a quarter of the cost, making it a smart upgrade from USB microphones.
Strengths and Weaknesses: Pros: Reputable brand heritage, large 18mm diaphragm for fuller sound, excellent SPL handling, low-noise circuitry, includes shock mount and cable. Cons: Tabletop stand is too short for most applications, requires separate phantom power, slightly boomy low-mid response, and lacks the airiness of premium large-diaphragm mics.
Bottom Line: The Tascam TM-80 is a reliable workhorse for home studio owners ready to graduate from USB mics. Its solid performance and trusted brand make it a safe, smart purchase. Invest in a proper boom arm to replace the limiting tabletop stand, and you’ll have a capable recording chain for vocals, instruments, and voice-over work.
10. Podcast Microphone Bundle with Live Sound Card Audio Mixer, Podcast Equipment Bundle with 3.5mm Condenser Microphone for Pc/Phone Live Streaming Singing Gaming, Sound Board with Voice Changer, Denoise

Overview: This comprehensive podcast bundle targets streamers and content creators seeking an all-in-one audio solution. The package combines a 3.5mm condenser microphone with the G10 Sound Board—a live audio mixer featuring built-in effects, voice changing, and noise reduction. It eliminates the need for separate audio interfaces, mixers, and software plugins.
What Makes It Stand Out: The G10 Sound Board is the star, offering 16 customizable sound effects, real-time voice modulation, and hardware-level noise reduction. The ability to adjust bass, treble, reverb, and pitch on-the-fly gives streamers professional production value without complex software. It works seamlessly with PCs, Macs, and mobile devices through simple plug-and-play connection.
Value for Money: At $149.99, this bundle saves significant money compared to buying a microphone, audio interface, and effects processor separately. While the included 3.5mm microphone is basic, the sound board’s capabilities justify the price for streamers prioritizing entertainment value over pristine audio fidelity. It’s a specialized tool for a specific audience.
Strengths and Weaknesses: Pros: Complete streaming solution, hardware effects eliminate CPU load, voice changer adds entertainment value, works with phones and computers, simplifies complex audio routing. Cons: 3.5mm microphone limits audio quality potential, sound board may have learning curve, not suitable for music production, and build quality may not withstand heavy travel.
Bottom Line: This bundle is ideal for live streamers, podcasters, and gamers who want interactive audio effects and simplified setup. If your priority is entertaining audiences with sound effects and voice modulation rather than achieving studio-grade vocal recordings, this is an excellent value. Serious musicians should invest in traditional XLR setups instead.
Why Condenser Microphones Dominate Podcasting in 2026
Condenser microphones have maintained their throne in the podcasting world for one fundamental reason: their unparalleled ability to capture vocal nuance. Unlike their dynamic counterparts, condenser diaphragms are lighter and more responsive, translating the subtlest inflections in your voice into electrical signals with microscopic precision. This sensitivity creates that “in-the-room” presence that builds parasocial relationships with listeners.
In 2026, the technology has become even more refined. Newer diaphragm materials like vapor-deposited graphene composites have pushed self-noise levels below 4dB-A, essentially making the microphone quieter than the air molecules moving around it. For podcasters, this means you can speak at natural, conversational volumes without raising your voice to overcome electronic hiss—a game-changer for intimate storytelling formats and late-night recording sessions when you can’t crank up the gain.
Understanding Condenser Microphone Technology
Before diving into specifications, grasp the fundamental mechanics. A condenser microphone operates as a variable capacitor where a thin conductive diaphragm sits parallel to a backplate. Sound waves vibrate this diaphragm, changing the capacitance and generating an electrical signal. This design requires external power—historically 48V phantom power, though modern variants have expanded the possibilities.
The Science Behind the Sensitivity
The magic lies in the diaphragm’s mass. Weighing less than a human hair, these gold-sputtered Mylar or nickel membranes respond to sound pressure changes up to 20 times faster than dynamic microphone coils. For podcasters, this translates to capturing the difference between a genuine laugh and a forced chuckle—the micro-dynamics that convey authenticity. However, this sensitivity is a double-edged sword that also captures your neighbor’s dog, your computer’s fan, and the existential hum of your refrigerator.
Phantom Power Requirements
While traditional studio condensers demand 48V phantom power from an audio interface or mixer, 2026’s ecosystem offers more flexibility. USB-C microphones now deliver clean, stable power while maintaining professional headroom. Some field-recording condensers include internal rechargeable batteries that provide true 48V for 40+ hours, liberating you from interface dependency. Understanding your power source is crucial—underpowered microphones exhibit compressed dynamic range and elevated noise floors that no amount of post-processing can fix.
Key Specifications That Actually Matter for Podcasters
Manufacturers love bombarding you with specs, but only a handful impact podcasting performance. Frequency response charts look impressive, but they don’t tell you how the microphone handles plosives or off-axis coloration. Here’s what demands your attention:
Self-Noise (Equivalent Noise Level): This is arguably the most critical spec for podcasters. Measured in dB-A, values below 15dB-A are acceptable, under 10dB-A are excellent, and under 6dB-A are currently considered world-class. In 2026, AI noise reduction is ubiquitous, but starting with a clean signal always beats fixing it in post.
Maximum SPL: While podcasters rarely hit 140dB like screaming vocalists, this spec indicates headroom before distortion. Look for 120dB minimum; 130dB+ gives you freedom to get animated without fear of clipping those emphatic moments.
Sensitivity Rating: Expressed in mV/Pa, this tells you how much output the mic produces. Higher sensitivity (20+ mV/Pa) means less gain required, which translates to cleaner signal from your preamps. This is especially vital for budget interfaces with noisy preamps.
Polar Patterns Explained: Choosing the Right Pickup Pattern
The polar pattern determines which sounds your microphone hears and which it ignores. Most podcasting condensers default to cardioid, but understanding the full spectrum unlocks creative possibilities.
The Cardioid Family: Your Primary Toolkit
Cardioid patterns capture sound from the front while rejecting rear noise—a podcasting staple. Supercardioid and hypercardioid offer tighter front pickup with some rear sensitivity, perfect for noisy environments but requiring more precise mic technique. In 2026, we’re seeing “adaptive cardioid” microphones that subtly adjust their rejection based on real-time ambient analysis, though these remain premium features.
Omnidirectional and Figure-8: Beyond the Basics
Omnidirectional captures sound equally from all directions—ideal for roundtable discussions or capturing room ambiance for atmospheric podcasts. Figure-8 (bidirectional) records front and rear while rejecting sides, perfect for face-to-face interviews with a single microphone. Multi-pattern microphones that switch between these options offer ultimate flexibility but often compromise slightly on self-noise compared to dedicated single-pattern mics.
The Great USB vs XLR Debate: Which Is Right for You?
The USB versus XLR decision in 2026 is less about quality and more about workflow philosophy. USB-C microphones now support 32-bit float recording, essentially eliminating digital clipping. They plug directly into computers, tablets, or even smartphones, making them irresistible for minimalist setups and traveling podcasters.
XLR remains the professional standard for good reason. It separates the microphone from the analog-to-digital conversion, letting you upgrade components independently. It also enables longer cable runs without noise—crucial for studio builds where the computer lives in a separate room. Hybrid podcasters often start with USB for simplicity, then migrate to XLR as their production demands grow.
The Rise of Digital Signal Processing in USB Mics
Modern USB condensers increasingly feature onboard DSP chips that handle compression, EQ, and noise gating before the signal hits your computer. While convenient, this can be problematic if the processing is too aggressive or non-bypassable. Look for microphones with “dry mode” options that preserve the unprocessed signal for maximum post-production flexibility.
Budget Considerations: What to Expect at Each Price Point
Microphone pricing in 2026 reflects not just component quality but software integration and AI features. Understanding what each tier offers prevents both overspending and disappointing compromises.
Entry-Level ($80-$200): Expect solid cardioid condensers with self-noise around 12-16dB-A. USB connectivity is standard, with basic but functional preamps. These mics won’t flatter your voice but will deliver clean, professional results with proper technique. Many include basic DSP like high-pass filters and gentle compression presets.
Mid-Range ($200-$500): This sweet spot offers dramatic improvements—self-noise drops to 8-12dB-A, build quality becomes studio-grade, and you gain multi-pattern options. XLR/USB hybrid designs appear here, along with better shock mounting and more sophisticated DSP if USB. This is where most serious hobbyists and semi-pro podcasters land.
Professional ($500-$1000): You’re paying for precision. Self-noise under 7dB-A, exceptionally flat frequency response, and superior off-axis rejection. These microphones reveal every detail of your performance and room, making them simultaneously rewarding and demanding. XLR dominates this category, requiring quality interfaces to shine.
Premium ($1000+): Beyond incremental spec improvements, you’re investing in craftsmanship, heritage, and sometimes unnecessary features. These are tools for broadcast facilities and collectors. For most podcasters, the law of diminishing returns hits hard here—spend the difference on acoustic treatment instead.
Hidden Costs to Factor In
A $300 microphone quickly becomes a $600 investment. Budget for a quality boom arm ($80-$150), shock mount (often included with mid-tier mics), pop filter ($20-$50), and at least basic acoustic treatment ($100-$300). If going XLR, add $150-$400 for a decent audio interface. These accessories fundamentally impact performance more than upgrading from a $400 to a $600 microphone.
Essential Features for Modern Podcasters
Beyond core specs, certain features have evolved from luxuries to necessities in 2026’s competitive landscape.
Zero-Latency Monitoring: Hearing yourself with no delay prevents vocal fatigue and helps you self-correct technique in real-time. Look for dedicated headphone jacks with independent volume control, even on USB models.
Touchless Mute Controls: Gesture-based muting (hand wave, voice command) has become standard on mid-tier and above USB microphones, preventing those jarring keyboard clicks or rustling sounds when manually hitting buttons.
AI-Assisted Setup: Some microphones now include companion apps that analyze your voice and room, automatically suggesting optimal gain, EQ curves, and even mic placement. While not foolproof, these tools flatten the learning curve dramatically.
Modular Capsules: Interchangeable capsules let you switch polar patterns or tonal characteristics without buying a whole new microphone. This future-proofs your investment as your format evolves.
The Impact of Room Acoustics on Condenser Mic Performance
Here’s the uncomfortable truth: a $200 microphone in a treated room will outperform a $2000 microphone in a reflective, noisy space. Condensers are acoustic microscopes that magnify room problems. Before upgrading your mic, treat your space.
The Reflection Reality: Untreated rooms create comb filtering and flutter echoes that make podcasts sound amateurish. You don’t need a full studio build—strategic placement of 2-inch acoustic panels at first reflection points (side walls, ceiling) and a corner bass trap can transform a bedroom into a viable recording space for under $300.
Mic Technique as Acoustic Treatment: Sometimes the best treatment is free. The closer you get to the microphone (without causing plosives), the more direct signal you capture relative to room sound. This “proximity effect” also adds desirable low-end warmth. Combine close miking with a reflection filter behind the mic, and you can achieve professional results even in challenging spaces.
Accessories That Transform Your Recording Experience
The microphone is just the starting point. These accessories determine whether your recordings reach their potential or fall victim to preventable problems.
Shock Mounts: Essential for decoupling the microphone from mechanical vibrations—footsteps, desk bumps, hard drive hum. The best mounts use elastic suspension or Rycote lyres. Avoid cheap clip-on mounts that transfer vibration directly to the mic body.
Boom Arms: Desk stands pick up every keyboard click and mouse movement. A quality boom arm with internal cable management positions the mic perfectly while keeping it isolated. Look for arms with adjustable tension that won’t sag over time.
Pop Filters: Metal mesh filters have largely replaced nylon in 2026, offering better plosive protection without high-frequency attenuation. Position 2-3 inches from the mic capsule for optimal performance.
Isolation Shields: These curved reflection filters block room sound from reaching the rear and sides of the microphone. While not a substitute for proper treatment, they’re invaluable for location recording or temporary setups.
Common Podcasting Recording Scenarios and Mic Selection
Your format dictates your microphone needs more than any spec sheet. Let’s match characteristics to common situations.
Solo Studio Recording: Prioritize low self-noise and smooth presence boost (3-6kHz) for vocal clarity. A fixed cardioid pattern is fine—simplicity reduces variables. Budget for acoustic treatment over fancy features.
In-Person Interviews: Consider multi-pattern mics set to figure-8 for two-person interviews, or a stereo pair of cardioids for three or more people. Omnidirectional works for roundtables but demands an exceptionally quiet room.
Remote Location Recording: USB-C bus-powered condensers with integrated windscreens and rugged builds are essential. Prioritize durability and self-contained operation over ultimate sound quality—consistency beats perfection when recording in unpredictable environments.
ASMR and Sound Design: These formats demand ultra-low self-noise (under 5dB-A) and extended high-frequency response to capture subtle textures. Omnidirectional or binaural setups are often preferred for immersive imaging.
Matching Mic Characteristics to Your Format
A boomy voice needs a microphone with gentle high-frequency lift and possibly a switchable low-cut filter. Sibilant voices benefit from smoother presence regions or built-in de-essing DSP. Deep, quiet speakers require maximum sensitivity and low noise. There’s no universal “best”—only best for your voice and context.
The Future of Condenser Microphone Technology
We’re witnessing fascinating innovations that will define the next generation of podcasting tools. MEMS (Micro-Electro-Mechanical Systems) microphones are shrinking condenser technology into chip-sized packages with performance rivaling traditional one-inch diaphragms. While currently limited to lavalier and mobile applications, expect full-sized studio implementations by 2027.
Adaptive acoustics represent another frontier. Microphones with built-in microphones (yes, microphones monitoring the microphone) can now measure room response in real-time and apply corrective EQ before the signal leaves the mic. This doesn’t replace treatment but makes marginal spaces more viable.
Sustainability has become a purchasing factor. Manufacturers are moving to recycled aluminum bodies, biodegradable packaging, and modular designs that allow capsule replacement rather than discarding entire microphones. This isn’t just eco-consciousness—modular mics offer better long-term value.
Testing and Evaluating Microphones Before You Buy
Specs tell part of the story, but your ears write the ending. Never purchase based on reviews alone.
The Test Phrase Methodology: Record the same passage across microphones you’re comparing. Use phrases rich in plosives (“Peter Piper picked”), sibilance (“Sally sells seashells”), and dynamic range (whisper to projected speech). Listen back on multiple systems—studio monitors, car speakers, and cheap earbuds—to understand how the mic translates across listening environments.
A/B Testing Protocol: Level-match recordings to within 0.5dB before comparing. Our ears perceive louder as better, creating false positives. Use blind testing when possible—have a friend switch between samples without telling you which is which.
Return Policy Leverage: Reputable retailers offer 30-day return policies. Use them. A microphone might sound perfect in a treated store demo room but reveal issues in your actual recording space.
Setting Up Your Condenser Microphone for Optimal Performance
Even the finest microphone produces mediocre results with poor setup. Follow these non-negotiable principles.
The 45-Degree Rule: Position the microphone 45 degrees off-axis from your mouth to minimize plosives while maintaining presence. This angle also reduces sibilance by directing those harsh “S” sounds away from the capsule’s most sensitive area.
Gain Staging Fundamentals: Set your interface gain so your normal speaking voice peaks around -18dBFS (digital) or 0dBVU (analog). This leaves 18dB of headroom for enthusiastic moments while keeping the signal well above your interface’s noise floor. Avoid the temptation to “record hot”—digital audio has no benefit from maximizing levels.
Proximity and the Bass Buildup: Every halving of distance to the microphone increases low-frequency response by approximately 6dB. Use this intentionally: 6-8 inches for natural voice, 2-4 inches for intimate radio-voice warmth. Beyond 12 inches, room sound dominates.
The 45-Degree Rule and Plosive Prevention
Plosives (“p,” “b,” “t” sounds) create blasts of air that slam the diaphragm, producing distracting low-frequency pops. The 45-degree angle deflects this air blast past the capsule. Combine this with a pop filter positioned halfway between your mouth and mic for bulletproof plosive protection without sacrificing clarity.
Maintenance and Longevity Tips
A quality condenser microphone can serve for decades with proper care. Neglect it, and you’ll be shopping for replacements in months.
Humidity is Enemy Number One: Condenser capsules are vulnerable to moisture. Store mics with silica gel packets in their cases. If you’ve been recording in a humid environment, let the microphone acclimate to room temperature in its case for an hour before use. Never blow on the capsule to “clean” it—moisture from your breath can cause permanent damage.
Dust and Debris Management: Use a soft brush to gently clean the grille. For stubborn buildup, slightly dampen a microfiber cloth with isopropyl alcohol and wipe the exterior only—never let liquid near the capsule. Some premium mics feature removable grilles you can wash separately.
Firmware Updates: Modern USB condensers receive firmware updates that improve DSP algorithms and compatibility. Check manufacturer websites quarterly. A microphone that sounds great today can sound even better after a well-engineered update.
Cable Care: XLR cables are the most failure-prone link in your chain. Coil them properly (over-under method) and never pull from the cable—always grasp the connector. A $50 cable can outlast a $500 microphone if treated correctly.
Frequently Asked Questions
1. Do I really need a condenser microphone, or can I use a dynamic mic for podcasting?
Dynamic microphones work excellently for podcasting, especially in untreated rooms or when recording multiple people in the same space. However, condensers capture more vocal detail and nuance, creating that intimate “podcast sound” listeners expect. Choose condensers when you have a quiet, controlled environment and want maximum vocal fidelity. Dynamics remain superior for live streaming, noisy spaces, or when you need extreme durability.
2. How much should I realistically budget for my first serious podcasting condenser setup?
Plan for $400-$600 total. This allocates $200-$300 for the microphone, $100-$150 for a quality boom arm and shock mount, $50 for a pop filter, and $100-$150 for basic acoustic treatment panels. If choosing XLR, add $150-$250 for a decent audio interface. This budget hits the sweet spot where each component performs professionally without overspending on diminishing returns.
3. Will a USB condenser microphone sound as good as an XLR setup?
In 2026, high-end USB condensers with 32-bit float recording can achieve parity with XLR setups costing twice as much. The difference isn’t the digital conversion—it’s flexibility. XLR lets you upgrade preamps, use external processors, and run long cables. USB offers simplicity and portability. For solo podcasters, quality USB mics eliminate audible compromise. For growing shows, XLR future-proofs your investment.
4. How do I know if my room is too noisy for a condenser microphone?
Perform this test: Record 30 seconds of silence in your space at normal gain settings. Normalize the recording to -3dB and listen through headphones. If you clearly hear computer fans, street noise, HVAC hum, or refrigerator cycles, your room needs treatment before upgrading to a sensitive condenser. A $50 reflection filter and $100 of acoustic panels often solve these issues better than a $1000 microphone would.
5. What’s the ideal distance between my mouth and the condenser microphone?
Start at 6-8 inches for a natural, balanced sound. Move to 4-6 inches for increased proximity effect (bass warmth) and intimacy, common in narrative podcasts. For ASMR or ultra-detailed work, 2-4 inches captures subtle mouth sounds and breaths. Always maintain at least 2 inches to prevent plosive distortion. Use the 45-degree angle rule at closer distances to manage air blasts.
6. Do I need phantom power for all condenser microphones?
Traditional studio condensers require 48V phantom power supplied by an audio interface or mixer. However, many 2026 USB condensers and battery-powered field-recording models generate their own power internally. Always check specifications. Connecting a phantom-powered mic to a source that doesn’t provide it results in extremely low output or no signal at all. Most modern interfaces have phantom power switches—ensure it’s engaged for XLR condensers.
7. How often should I replace my condenser microphone?
With proper care, a quality condenser microphone lasts 15-30 years or more. The capsule doesn’t “wear out” like a dynamic mic’s coil might. Replace microphones when your needs fundamentally change (switching from solo to interview format), when repair costs exceed replacement value, or when new technology offers genuinely transformative features. Don’t upgrade annually for marginal spec improvements—spend that money on acoustic treatment or microphone technique coaching instead.
8. Can I use a condenser microphone for recording remote guests over the internet?
Absolutely, and it’s increasingly common. USB condensers with integrated DSP can apply compression and noise reduction before the signal reaches Zoom or Riverside.fm, giving remote guests a broadcast-quality sound that elevates your entire production. Ensure the mic has zero-latency monitoring so guests hear themselves without delay, preventing talk-over issues. Many 2026 models include “meeting mode” DSP presets optimized for video conferencing platforms.
9. What’s more important: microphone quality or audio interface quality?
For XLR setups, the interface quality matters as much as the microphone. A $1000 microphone into a $50 interface’s noisy preamps sounds worse than a $300 microphone into a $300 interface. Budget for both components appropriately. For USB microphones, this question is moot—the mic contains the interface. This is why USB mics offer such compelling value at entry and mid-levels; you’re guaranteed a matched system.
10. How do I clean my condenser microphone without damaging it?
Never touch the capsule. Use a soft, dry brush to clean the grille exterior. For disinfecting, lightly dampen a microfiber cloth with 70% isopropyl alcohol and wipe only the metal grille—never let moisture seep toward the capsule. Remove the grille if possible for thorough cleaning. Store microphones in their cases with silica gel packets to control humidity. If the capsule becomes visibly dusty, send it to a professional technician. DIY capsule cleaning almost always causes irreparable damage.