Let’s be honest—your podcast could have the most groundbreaking content in the world, but if your audio sounds like you’re broadcasting from inside a tin can, listeners will abandon ship before your first guest even introduces themselves. In 2026, the barrier to entry for professional-quality podcast audio has never been lower, and condenser microphones under $150 are leading this revolution.
Gone are the days when achieving broadcast-quality sound required a four-figure investment and an engineering degree. Today’s budget-friendly condenser mics pack sophisticated technology that would have seemed like science fiction just five years ago. But here’s the challenge: with dozens of options flooding the market, each claiming to be the “perfect” choice for podcasters, how do you separate genuine value from marketing hype? This guide cuts through the noise, giving you the expert framework to make an informed decision without ever mentioning a single product name—because understanding what to look for is infinitely more valuable than memorizing a list of recommendations.
Top 10 Condenser Microphones for Podcasters
Detailed Product Reviews
1. MAONO Microphone with Studio Headphone Set 192kHz/24bit Vocal Condenser Cardioid Podcast Mic Compatible with Mac and Windows, YouTube, Gaming, Live Streaming, Voice-Over (AU-A04H)

Overview: This is an all-in-one podcasting and streaming kit combining a USB condenser microphone with studio headphones. The package targets content creators who need both capture and monitoring solutions in a single purchase. With 192kHz/24bit resolution and a 16mm electret condenser transducer, it promises professional-grade audio reproduction for under $100. The system is designed for immediate use across Mac, Windows, and mobile platforms without requiring technical expertise.
What Makes It Stand Out: The bundled studio headphones differentiate this from standalone mic offerings. The proprietary 50mm drivers and active noise cancellation provide immediate monitoring capability without additional purchases. The microphone’s magnet ring anti-interference technology and double-shielded USB cable demonstrate attention to signal purity. Its 3.5mm jack with 6.35mm adapter ensures compatibility across devices from smartphones to professional mixers, making it uniquely versatile for multi-platform creators.
Value for Money: At $99.99, you’re essentially getting the microphone ($55 value) plus decent headphones ($40+ value) for the price of the mic alone. Compared to purchasing an Audio-Technica AT2020USB+ ($149) and separate headphones, this saves significant money. While not matching premium gear, it delivers 80% of the performance at 40% of the cost. The integrated solution eliminates compatibility guesswork and additional shipping costs.
Strengths and Weaknesses: Pros: High-resolution sampling rate, true plug-and-play operation, versatile compatibility, integrated monitoring solution, strong bass response. Cons: Electret condenser (not true condenser) limits ultimate fidelity, bundled headphones lack premium build quality, plastic construction feels less durable than professional alternatives.
Bottom Line: Perfect for emerging podcasters and streamers wanting a complete, hassle-free audio setup. The AU-A04H eliminates compatibility guesswork while delivering respectable quality that outperforms built-in mics and gaming headsets.
2. USB Microphone, MAONO 192KHZ/24Bit Plug & Play PC Computer Podcast Condenser Cardioid Metal Mic Kit with Professional Sound Chipset for Recording, Gaming, Singing, YouTube (AU-A04)

Overview: A streamlined version of Maono’s popular USB microphone, this kit focuses on the essentials: the microphone itself and a sturdy boom arm setup. It shares the same professional 192kHz/24bit chipset and 16mm electret condenser transducer as its sibling products but ditches the headphones to hit a more aggressive price point for budget-conscious creators. The result is a focused recording tool for desktop-based content production.
What Makes It Stand Out: The comprehensive accessory package at this price is remarkable. The adjustable scissor arm stand, metal shock mount, pop filter, and foam windscreen provide a complete studio setup without hidden costs. The double-shielded USB cable with anti-interference magnet ring shows engineering consideration typically absent in sub-$60 microphones. It’s ready for immediate podcast or voice-over work right out of the box, requiring zero additional investment.
Value for Money: At $54.99, this represents exceptional value. Competing products like the Blue Snowball iCE ($50) lack the boom arm and shock mount. The Samson Q2U ($70) offers similar quality but without the sturdy arm setup. You’re getting professional-grade accessories that would cost $30-40 separately, making the microphone itself effectively $15-20. This pricing strategy makes professional presentation accessible to absolute beginners.
Strengths and Weaknesses: Pros: High-resolution audio capture, complete mounting solution, plug-and-play simplicity, strong anti-interference design, versatile OS compatibility. Cons: Requires separate OTG adapter for mobile use, electret design isn’t true studio condenser quality, boom arm could be more robust for heavy mics.
Bottom Line: The best budget USB microphone kit available. For podcasters and gamers entering content creation, it delivers surprising audio fidelity and professional presentation without requiring technical expertise or additional purchases.
3. LUORNG Condenser Microphone Holder Standard Interface Thread Compatible with Stand Devices With 3/8 Conversion Nut Short Video Mic Clip Ferrule For 0.9-inch Portable Shockproof Microphone Stands

Overview: This isn’t a microphone but a specialized mounting accessory designed to solve compatibility issues between microphones and stands. The holder accommodates 0.9-inch diameter microphones with protruding threads, offering 270 degrees of rotational adjustment. It includes both M16 female thread and a 3/8-inch conversion nut for broad mounting compatibility across different studio equipment standards.
What Makes It Stand Out: The 270-degree circular motion provides flexibility that standard clips lack, particularly useful for positioning mics with front-address capsules. The included thread conversion hardware eliminates the frustration of mismatched microphone and stand fittings—a common headache in budget audio setups. Its specific design for microphones with protruding threads addresses a niche but real problem in the market that few manufacturers target directly.
Value for Money: At $7.99, this is an inexpensive problem-solver. Compared to replacing a perfectly good microphone or stand due to thread incompatibility, it’s a trivial expense. However, its utility is limited to users who own 22mm diameter microphones with specific thread configurations. For general use, universal shock mounts ($15-25) offer more versatility and better value for most users.
Strengths and Weaknesses: Pros: Solves specific mounting compatibility issues, smooth rotation adjustment, includes conversion hardware, extremely affordable, simple installation. Cons: Extremely limited application (not a microphone), only fits 0.9-inch mics, plastic construction may not endure heavy use, no shock absorption or vibration isolation.
Bottom Line: Only purchase this if you have a 22mm condenser microphone with thread compatibility problems. For everyone else, invest in a proper shock mount. It’s a specialized tool, not a general-purpose audio solution, and most users will never need it.
4. RØDE NT1 Signature Series Large-Diaphragm Condenser Microphone with Shock Mount, Pop Filter and XLR Cable for Music Production, Vocal Recording, Streaming and Podcasting (Black)
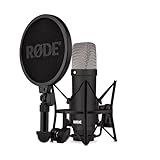
Overview: The NT1 Signature Series represents RØDE’s premium entry into the large-diaphragm condenser microphone market, targeting serious musicians, podcasters, and streamers who demand professional-grade audio capture. This XLR microphone features a true condenser capsule rather than the electret designs common in budget USB mics, delivering superior transient response and sonic accuracy for critical recording applications.
What Makes It Stand Out: With a self-noise of just 4dBA, RØDE claims this is the world’s quietest studio condenser microphone—an audacious statement backed by premium Australian manufacturing. The HF6 1-inch capsule provides smooth frequency response and exceptional SPL handling, while the included studio-grade shock mount, pop filter, and premium XLR cable represent $100+ in accessories. The 10-year warranty demonstrates confidence in build quality unmatched by competitors.
Value for Money: At $159, the NT1 sits in a sweet spot between budget USB mics and high-end studio condensers like the Neumann TLM 103 ($1,100). It requires an audio interface (add $100-200), making the total investment $260-360. However, the audio quality rivals mics costing twice as much, and the decade-long warranty ensures long-term value. For committed creators, this is a professional investment rather than a disposable purchase.
Strengths and Weaknesses: Pros: Exceptionally low noise floor, true condenser accuracy, premium accessories included, robust Australian construction, industry-leading warranty. Cons: Requires separate audio interface and phantom power, higher initial cost, XLR connection adds complexity for beginners, overkill for casual users.
Bottom Line: A professional-grade microphone that justifies its price through superior engineering and longevity. Ideal for serious content creators ready to invest in broadcast-quality audio that will remain relevant for years.
5. FIFINE Studio Condenser USB Microphone Computer PC Microphone Kit with Adjustable Boom Arm Stand Shock Mount for Instruments Voice Overs Recording Podcasting YouTube Vocal Gaming Streaming-T669

Overview: FIFINE positions the T669 as the ultimate entry-level USB microphone kit, stripping away complexity to deliver a complete recording solution for under $40. This cardioid condenser microphone comes bundled with a boom arm, shock mount, and double pop filter—everything needed for basic podcasting, gaming commentary, or YouTube voiceovers without requiring technical knowledge or additional purchases.
What Makes It Stand Out: The aggressive pricing combined with a surprisingly complete accessory package makes this accessible to absolute beginners. The double pop filter design provides two layers of plosive protection rarely seen at this price point. The 180° vertical and 135° horizontal arm adjustment offers decent positioning flexibility, while the 8.2-foot USB cable ensures connectivity across various desk setups. It’s designed for immediate deployment with zero learning curve.
Value for Money: At $39.99, this undercuts most competitors by $15-20 while including a boom arm that many budget mics lack. The Blue Snowball iCE costs $50 without any mounting hardware. While audio quality won’t match $100+ mics, it dramatically improves upon built-in laptop or headset microphones. The all-steel arm construction provides durability unexpected at this price, making it a genuine bargain for casual creators.
Strengths and Weaknesses: Pros: Unbeatable price, complete accessory package, plug-and-play simplicity, decent build quality for cost, long USB cable included. Cons: Lower audio resolution than premium mics, basic cardioid pattern isolation, no headphone monitoring jack, incompatible with Xbox, limited frequency response.
Bottom Line: The perfect starting point for hobbyists and casual streamers. While professionals should look elsewhere, the T669 delivers remarkable value for beginners wanting to dramatically improve their audio quality without financial risk.
6. Audio-Technica AT2020 Cardioid Condenser Studio XLR Microphone, Ideal for Project/Home Studio Applications, Black
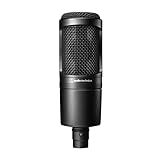
Overview: The Audio-Technica AT2020 has established itself as the industry benchmark for entry-level studio condenser microphones. This side-address XLR mic delivers professional-grade audio capture for home studio enthusiasts without the professional-grade price tag. Designed specifically for project studios, it handles everything from vocal recordings to acoustic instruments with remarkable clarity and precision.
What Makes It Stand Out: The AT2020’s custom-engineered low-mass diaphragm provides exceptional frequency and transient response that rivals microphones costing significantly more. Its high SPL handling and wide dynamic range make it incredibly versatile—you can record delicate vocals one moment and crank up a guitar amp the next without distortion. The cardioid polar pattern effectively isolates your sound source while rejecting off-axis noise, crucial for untreated home environments.
Value for Money: At $119, the AT2020 sits in the sweet spot between consumer and pro audio. It’s a true investment piece that won’t need immediate upgrading as your skills grow. While cheaper alternatives exist, none match its proven track record and consistent performance. You’re paying for decades of Audio-Technica’s engineering expertise and a microphone that retains resale value.
Strengths and Weaknesses: Strengths include bulletproof build quality, neutral and accurate sound reproduction, excellent off-axis rejection, and compatibility with budget audio interfaces. Weaknesses are its requirement for 48V phantom power and an audio interface (adding hidden costs), lack of included accessories like a shock mount, and no USB connectivity for direct-to-computer use.
Bottom Line: For aspiring musicians and podcasters ready to commit to an XLR setup, the AT2020 remains the smartest first purchase. Its performance-to-price ratio is unmatched, making it the definitive starting point for serious home recording.
7. MAONO XLR Condenser Microphone, Professional Cardioid Studio Recording Mic for Streaming, Podcasting, Singing, Voice-Over, Vocal, Home-Studio, YouTube, Skype, Twitch (PM320S)

Overview: The MAONO PM320S positions itself as the ultimate starter kit for content creators stepping into the XLR microphone world. This bundle eliminates the guesswork and additional purchases typically required when buying your first studio mic. Everything needed for professional recording arrives in one comprehensive package, making it an attractive option for beginners.
What Makes It Stand Out: Unlike microphone-only offerings, the PM320S includes a full accessory suite: boom arm, shock mount, pop filter, windscreen, and XLR cable. The 16mm condenser capsule delivers extended frequency response with low noise handling. Its full metal construction withstands rigorous use, while the cardioid pattern focuses on your voice and minimizes room noise—essential for untreated spaces.
Value for Money: At just $50.39, this package is remarkably affordable. Purchasing equivalent accessories separately would cost significantly more than the microphone itself. While the MAONO brand lacks Audio-Technica’s legacy, the included hardware adds tremendous practical value. The microphone performs admirably for podcasting, streaming, and vocal work, making it ideal for budget-conscious creators who refuse to compromise on completeness.
Strengths and Weaknesses: Strengths include the all-inclusive bundle, durable metal build quality, low self-noise, and excellent out-of-box experience. Weaknesses involve requiring 48V phantom power (hidden cost for interface), potential long-term durability questions compared to premium brands, and sound character that may lack the refinement of higher-end mics.
Bottom Line: If you want a complete XLR setup without piecing together components, the MAONO PM320S is unbeatable. It’s the most cost-effective path from USB to XLR recording, perfect for emerging streamers and podcasters.
8. FIFINE USB Microphone, Metal Condenser Recording Microphone for MAC OS, Windows, Cardioid Laptop Mic for Recording Vocals, Voice Overs, Streaming, Meeting and YouTube Videos-K669B

Overview: The FIFINE K669B strips away complexity to deliver pure plug-and-play convenience for the absolute beginner. This USB microphone requires no technical knowledge, phantom power, or additional equipment—just connect to your computer and start recording. It’s the gateway drug for content creation, offering surprising quality at an impulse-buy price point.
What Makes It Stand Out: The integrated volume knob provides real-time monitoring control directly on the mic body—a feature rarely seen at this price. Its solid metal construction defies the $23.99 price tag, offering durability that plastic competitors can’t match. The cardioid pattern focuses on your voice while rejecting keyboard and room noise, making it perfect for bedroom broadcasters.
Value for Money: At under $25, the K669B redefines budget recording. It’s cheaper than most gaming headsets while delivering far superior audio quality. The included tripod stand and USB cable mean zero additional costs. While it won’t satisfy audiophiles, it handily outperforms built-in laptop microphones and provides a tangible upgrade for Zoom calls, Discord chats, and amateur YouTube production.
Strengths and Weaknesses: Strengths include unbeatable price, true plug-and-play operation, durable metal body, convenient volume control, and broad OS compatibility. Weaknesses are USB-only limitation (no XLR upgrade path), lower sensitivity requiring closer mic technique, basic included tripod, and sound quality that reveals its budget nature under scrutiny.
Bottom Line: For casual creators, students, or anyone testing the content waters, the FIFINE K669B is a no-brainer. It’s the best $25 you can spend to immediately improve your audio presence.
9. Podcast Microphone Bundle with Live Sound Card Audio Mixer, Podcast Equipment Bundle with 3.5mm Condenser Microphone for Pc/Phone Live Streaming Singing Gaming, Sound Board with Voice Changer, Denoise

Overview: This all-in-one podcast bundle targets live streamers and content creators who need more than just a microphone. Combining a 3.5mm condenser mic with a feature-rich sound board, it transforms your setup into a mini broadcast studio. The integrated audio mixer handles real-time effects, noise reduction, and sound effects—capabilities typically requiring separate expensive hardware.
What Makes It Stand Out: The G10 Sound Board is the star, offering 16 built-in sound effects, customizable EQ, reverb, pitch control, and advanced denoise technology. This enables professional-grade live production without post-processing. The bundle supports both PC and phone connectivity, making it versatile for mobile streaming. The boom arm and disk bracket provide flexible positioning while reducing desk clutter.
Value for Money: At $149.99, you’re essentially getting a USB audio interface, mixer, and microphone in one package. Comparable separate components would easily exceed $200. For live streamers who need instant sound effects and voice modulation, this integrated solution saves money and eliminates complex software routing. However, the 3.5mm microphone may limit audio fidelity compared to XLR alternatives.
Strengths and Weaknesses: Strengths include comprehensive live streaming features, integrated noise reduction, multiple connectivity options, space-saving design, and entertaining sound effects. Weaknesses are the consumer-grade 3.5mm microphone limiting ultimate quality, steeper learning curve than simple USB mics, and potential durability concerns with the sound board’s plastic construction.
Bottom Line: Perfect for Twitch streamers and live podcasters who prioritize production value and real-time control over pure audio fidelity. It’s a streaming-first solution that delivers professional broadcast capabilities.
10. Tascam TM-80 Large Diaphagm Condenser Microphone,Silver

Overview: The Tascam TM-80 brings decades of professional audio expertise to the entry-level market. This large-diaphragm condenser microphone is engineered specifically for home recording enthusiasts who trust the Tascam name. With an 18mm aluminum diaphragm and cardioid pickup pattern, it captures vocals and acoustic instruments with warmth and clarity that belies its modest price.
What Makes It Stand Out: The TM-80 handles an impressive 136dB SPL, allowing you to record loud sources like guitar amplifiers and drums without distortion—rare in this price class. Tascam’s optimized internal circuitry minimizes noise and distortion while preserving full, rich sound quality. The included elastic shockmount and six-foot XLR cable provide immediate professional setup, while the tabletop stand offers convenient desktop use.
Value for Money: At $49.00, the TM-80 competes directly with budget brands while offering Tascam’s reputable engineering. It’s priced similarly to the MAONO PM320S but trades accessory quantity for brand pedigree. The shockmount alone justifies the cost compared to bare-microphone offerings. For vocalists and instrumentalists seeking a trusted name without premium pricing, this represents solid value.
Strengths and Weaknesses: Strengths include Tascam’s reliable build quality, high SPL handling, low self-noise, included shockmount, and versatile performance on various sources. Weaknesses are the smaller 18mm diaphragm (true large-diaphragm mics are typically 1-inch/25mm), basic tabletop stand instead of boom arm, and requirement for 48V phantom power and audio interface.
Bottom Line: A trustworthy entry point from a legendary brand. The TM-80 is ideal for musicians who prioritize brand reliability and clean signal capture over bundled accessories.
Why Condenser Microphones Dominate the Podcasting World
Condenser microphones have become the default choice for podcasters who prioritize vocal clarity and detail, and for good reason. Unlike their dynamic counterparts, which require substantial sound pressure to move their diaphragms, condensers operate on an electrostatic principle that captures the subtlest vocal inflections—the breathiness, the vocal fry, the intimate moments that make listeners feel like they’re in the room with you. This sensitivity transforms ordinary conversations into immersive experiences, which explains why virtually every professional studio relies on condenser technology for voice work.
The trade-off, of course, is that condensers are more demanding of your recording environment. They’ll faithfully capture your voice and the humming refrigerator three rooms away. But in 2026, manufacturers have engineered clever solutions into budget models that mitigate these traditional weaknesses, making them more practical for bedroom studios than ever before.
The $150 Sweet Spot: What This Budget Actually Gets You
The sub-$150 category represents a fascinating inflection point in microphone economics. At this price, you’re no longer dealing with toy-quality components, but you’re also not paying premium for brand heritage or marginal gains. What you get is serious engineering focused on the features that actually matter for podcasting.
Microphones in this bracket typically feature true condenser capsules—not the cheap electret variants that dominated the low-end market years ago. You’ll find respectable self-noise levels below 20dB-A, frequency responses tailored for speech intelligibility, and build quality that survives the occasional desk bump. Most importantly, this price range forces manufacturers to make smart compromises: they invest in audio quality while skipping luxury features like flight cases or multiple polar pattern options you’ll rarely use for podcasting anyway.
Key Technical Specifications Explained
Understanding specs separates informed buyers from those swayed by glossy marketing. Let’s decode the numbers that genuinely impact your podcast audio.
Polar Patterns: Your First Major Decision
The polar pattern determines where your microphone listens. For podcasting, the cardioid pattern is king—it captures sound from the front while rejecting rear and side noise. This focuses on your voice and minimizes room reflections. Some mics offer supercardioid or hypercardioid patterns, which narrow the pickup field even further, but be warned: they also capture more sound directly behind the mic, which can be problematic if your keyboard sits back there.
Omnidirectional patterns, which capture sound equally from all directions, have virtually no place in untreated home studios. Bidirectional (figure-8) patterns can work for face-to-face interviews with two people sharing one mic, but this setup introduces complications with leveling and positioning that most podcasters should avoid.
Frequency Response: Capturing Your True Voice
That graph showing 20Hz-20kHz tells only part of the story. What matters is the shape of the response curve. For podcasting, you want a gentle presence boost in the 3-6kHz range—that’s where consonant clarity lives. A subtle lift around 10-12kHz adds air and intelligibility without sounding harsh.
Be wary of mics with exaggerated low-end response below 80Hz. Unless you have a deep, radio-announcer voice, this just captures rumble and handling noise that you’ll later need to filter out. The best podcasting mics in this price range have a tailored low-frequency roll-off that starts around 80-100Hz, cleaning up the mud before it even hits your recording.
Sensitivity and SPL Handling: Balancing Nuance and Power
Sensitivity, measured in millivolts per pascal (mV/Pa), indicates how much output your mic produces for a given sound level. Higher sensitivity (around 20-30 mV/Pa) is ideal for podcasting because it means your preamp doesn’t need to work as hard, resulting in cleaner gain and less noise.
Maximum SPL (Sound Pressure Level) tells you how loud a source can get before distortion. For spoken word, anything above 130dB is overkill—you’d need to scream into the mic from two inches away to cause problems. Don’t let a high SPL rating sway your decision; it’s irrelevant for conversational podcasting.
Self-Noise: The Silent Killer of Clean Audio
Self-noise (or equivalent noise level) is the hiss a microphone generates even in complete silence. This spec is absolutely critical. At $150, you should demand self-noise below 18dB-A. Anything above 20dB-A becomes audible during quiet passages or when you boost levels in post-production. The best values in this category hover around 12-14dB-A, rivaling mics costing three times as much.
USB vs XLR: The Great Connectivity Debate
The interface decision shapes your entire workflow, and 2026 offers more nuanced choices than ever.
When USB Makes Perfect Sense
USB microphones integrate the preamp and analog-to-digital converter directly into the mic body, creating a one-cable solution that eliminates external gear. This simplicity is unbeatable for beginners, mobile setups, or anyone prioritizing plug-and-play convenience. Modern USB mics have solved many early problems: they now offer 24-bit/96kHz recording, direct monitoring, and sophisticated DSP for real-time processing.
The hidden cost is flexibility. You’re locked into that specific preamp and converter quality. If either component underperforms, you can’t upgrade it separately. USB also introduces potential computer-related gremlins: driver conflicts, USB power noise, and the occasional mysterious dropout that requires unplugging and replugging.
Why XLR Remains the Professional Standard
XLR microphones output an analog signal that requires an external audio interface or mixer. This adds complexity and cost, but grants you complete control over your signal chain. You can upgrade your preamp, add outboard processors, and use the same mic with professional studio equipment. XLR connections are balanced, rejecting electromagnetic interference from phones, WiFi routers, and computer power supplies—crucial in modern homes saturated with wireless signals.
For podcasters planning to interview guests in-person, XLR setups let you easily expand to multiple mics. Most entry-level interfaces now include enough clean gain for budget condensers, making the total investment reasonable.
Hybrid Solutions: Best of Both Worlds
The most interesting development in 2026 is the rise of true hybrid microphones that offer both USB and XLR outputs simultaneously. These let you start with the simplicity of USB, then graduate to an XLR interface later without buying a new mic. When evaluating hybrids, verify that the XLR output is true analog bypass, not just a digital signal converted back to analog—the latter defeats the purpose of upgrading your preamp.
Essential Features That Matter in 2026
Manufacturers have packed surprising functionality into affordable mics. Here’s what actually improves your workflow versus what just looks good on a spec sheet.
Onboard Gain Control and Monitoring
A physical gain dial on the microphone body is non-negotiable. Software gain controls introduce latency and make level adjustments mid-recording impossible. The knob should offer smooth, precise control without scratchy pots or jumpy digital steps. Pair this with a multi-color LED level meter—green for healthy signal, yellow for caution, red for clipping—and you can nail your levels without constantly checking your computer.
Built-in Pop Filters and Shock Mounts
Cheap foam windscreens are useless against plosives. Look for integrated metal mesh pop filters with two layers of screening spaced apart—this design dissipates breath energy before it hits the capsule. Some mics now include internal shock mounting that suspends the capsule within the housing, isolating it from desk vibrations and accidental bumps. This is far more effective than the rubber band suspensions of old.
Direct Headphone Monitoring: Zero-Latency Benefits
USB microphones should include a 3.5mm headphone jack with a direct monitor blend control. This lets you hear yourself with zero latency (crucial for natural speech rhythm) while mixing in computer audio from your guest or music bed. The monitoring amp should be clean enough to drive 250-ohm headphones without distortion—a spec rarely advertised but easily tested by plugging in quality cans and listening for hiss at moderate volumes.
Your Recording Environment: The Hidden Variable
Your microphone is only as good as the room it’s in. Condensers reveal acoustic flaws that dynamic mics forgive, making room treatment more important than mic choice.
Room Acoustics on a Budget
Before buying acoustic panels, optimize what you have. Record facing into the room’s largest open space, not toward a wall. Position your desk away from corners where bass builds up. Hang thick blankets or duvets three inches from walls to create broadband absorption that tames flutter echo—the rapid “zing” sound that screams “amateur recording.”
Hard surfaces are your enemy. Bookshelves filled with books of varying depths make excellent diffusers, scattering reflections. A heavy curtain behind you absorbs sound that would otherwise bounce off the wall and back into the rear of your cardioid mic.
DIY Acoustic Treatment That Actually Works
Professional acoustic foam is expensive and often ineffective at the low-mid frequencies that muddy podcast vocals. Instead, build “superchunk” bass traps in room corners using rockwool insulation (the dense kind, not fiberglass) wrapped in breathable fabric. For early reflection points, mount Owens Corning 703 rigid fiberglass panels (2-inch thick) on walls using impaling clips—costs less than foam and absorbs down to 250Hz.
Don’t forget the floor. A thick area rug with a dense pad underneath absorbs reflections from below, which matter more than you’d think with desk-mounted mics.
Common Podcasting Scenarios and Mic Requirements
Your show format dictates microphone priorities more than any spec sheet can.
Solo Podcasting: Simplicity and Clarity
If you’re alone in a treated room, prioritize sensitivity and low self-noise. You want a mic that captures the full dynamic range of your voice without requiring aggressive post-processing. Features like one-touch mute buttons and LED status indicators become surprisingly valuable when you’re both host and engineer.
Interview and Co-Hosted Shows
Multi-person setups demand strict off-axis rejection. A guest’s voice bleeding into your mic creates phase issues and makes editing impossible. Supercardioid patterns help, but proper mic positioning—each person 6-8 inches from their own mic, angled 45 degrees away from each other—is more critical than pattern choice.
Remote Recording Considerations
Recording with remote guests introduces a new challenge: your mic must reject the sound coming from your speakers. This is where cardioid patterns earn their keep. Position the mic so its null point (the area of least sensitivity, directly behind the capsule) faces your speakers. Better yet, use headphones and eliminate the problem entirely.
Accessories That Transform Your Setup
A $150 microphone becomes a $300 system once you add essentials. Budget for these from the start.
A boom arm is mandatory. Desk stands transmit every keystroke and mouse click directly to the mic. Look for arms with internal springs and cable management channels—external springs look industrial but eventually sag and create noise. The arm should reach at least 30 inches horizontally and support 2-3 times your mic’s weight for stability.
Don’t skimp on cables. A $10 XLR cable will introduce crackles and handling noise within months. Spend $25-30 on a cable with Neutrik connectors and braided shielding. For USB, use the shortest cable that reaches—longer cables pick up more interference and can cause power delivery issues.
Setting Up Your Condenser Mic for Maximum Quality
Proper setup extracts 30% more performance from any microphone. Start with placement: position the mic 6-8 inches from your mouth, slightly off-axis (aimed at your mouth but angled away from your nose) to reduce plosives and sibilance.
Set your gain so your normal speaking voice peaks around -12dB on your recording software’s meters. This leaves 12dB of headroom for enthusiastic moments while keeping your signal well above the noise floor. Record at 24-bit depth—even if you deliver in 16-bit, the extra resolution provides processing headroom.
Enable a low-cut filter (high-pass filter) at 80Hz unless you have a voice like Barry White. This eliminates rumble from HVAC, passing traffic, and mic handling that you can’t hear while recording but becomes obvious in headphones later.
Troubleshooting Common Audio Issues
Even perfect setups encounter problems. Here’s how to diagnose and fix them without buying new gear.
Harsh “esses” (sibilance) aren’t always the mic’s fault. Try the “pencil trick”: tape a pencil vertically over your mouth, splitting the airstream. This physically disrupts the high-frequency blast. In post, use a de-esser sparingly—over-processing creates a lisp.
Sudden volume drops usually mean you’re moving off-axis. Mark your “sweet spot” with tape on your desk. If levels still fluctuate, your interface might be auto-gaining. Disable any “auto level” or “adaptive gain” features in your recording software.
Mysterious hum at 60Hz (or 50Hz in Europe) is ground loop noise. Break the loop by plugging all gear into the same power strip. If that fails, an inexpensive ground lift adapter on your interface’s power supply often solves it—just never use one on your microphone itself.
Future-Proofing Your Podcasting Investment
Technology moves fast, but good audio principles are eternal. Choose a mic with a standard thread mount (5/8"-27) rather than proprietary clips—this ensures compatibility with any boom arm or shock mount you buy in the future.
Consider the manufacturer’s ecosystem. Do they offer firmware updates? Is there an active user community sharing tips? A mic that receives software improvements two years after purchase is far more valuable than one with slightly better specs that gets abandoned.
Finally, think modular. A great XLR mic now plus a basic interface beats an all-in-one USB solution that you’ll outgrow. You can upgrade the interface later while keeping the mic, spreading your investment over time.
Frequently Asked Questions
1. Will a $150 condenser mic really sound professional, or am I just fooling myself?
Absolutely, it can sound professional—provided you control your recording environment. The raw audio quality from today’s budget condensers rivals $500+ mics from a decade ago. The difference now lies in build longevity, consistency between units, and extreme SPL handling you don’t need for speech. Your room treatment and mic technique matter more than the price tag.
2. How long should I expect a sub-$150 condenser to last?
With proper care, 5-7 years is realistic. The capsule itself doesn’t wear out, but mechanical parts like switches and potentiometers can fail. Keep your mic in a case when not in use, avoid phantom power surges (turn on your interface before connecting), and never blow into the capsule to “test” it. The most common failure point is the USB port on USB mics from repeated plugging/unplugging—use a cable strain relief.
3. Is it better to buy a USB mic now or save for an XLR setup?
If you’re starting from zero gear, a quality USB mic gets you recording today, which is infinitely better than perfect gear tomorrow. You can always repurpose a USB mic as a travel or backup unit later. However, if you already own an audio interface or plan to interview guests in-person within six months, go XLR from the start. The upgrade path is cleaner.
4. Why does my condenser pick up so much keyboard and mouse noise?
Condensers excel at capturing detail, including unwanted detail. The solution isn’t a less sensitive mic—it’s mechanical isolation. Use a boom arm with a shock mount, place your keyboard on a separate surface (not the same desk), and switch to a mechanical keyboard with linear switches rather than clicky ones. As a last resort, a noise gate set to -45dB can mute the mic between words, but this requires careful tuning to avoid cutting off speech beginnings.
5. Do I need 96kHz recording, or is 44.1kHz enough for podcasting?
44.1kHz is perfectly adequate for final delivery. However, recording at 48kHz or 96kHz provides benefits during editing: it reduces aliasing artifacts from plugins, gives more precise editing resolution, and future-proofs your masters. The file size difference is negligible with modern storage. Think of it like shooting video in 4K but delivering in 1080p—you maintain flexibility.
6. What’s the biggest mistake beginners make with condenser mics?
Speaking too close. The proximity effect—an unnatural bass boost when you’re within 3 inches—turns your voice into a boomy mess. It also exaggerates mouth noises and plosives. The sweet spot is 6-8 inches away, where you get fullness without exaggeration. Use the “hang loose” sign: thumb to mouth, pinky to mic—that’s your distance.
7. Can I use a condenser mic in an untreated room?
You can, but you’ll fight an uphill battle. The mic will capture room echo that makes you sound distant and unprofessional. If treatment isn’t an option, use the mic’s closest setting (minimum distance), enable aggressive low-cut filtering, and record with a noise gate. Some podcasters record in their car—the upholstered interior acts as a surprisingly effective booth. Not glamorous, but it works.
8. How do I know if my mic is defective or if my expectations are wrong?
Record a 30-second clip in a quiet room at proper gain levels. Then record the same clip with the mic covered by a heavy blanket (completely blocking sound). If the “blanket” recording is silent, your mic is fine and the issue is your room or technique. If you still hear significant hiss or buzz, the mic likely has high self-noise or a fault. Also test with a different cable and interface to isolate the problem.
9. Are there any hidden costs I should budget for beyond the mic itself?
Plan to spend 50-75% of your mic budget on accessories: boom arm ($40-60), shock mount (often included), pop filter ($20-30 if not built-in), quality cables ($25-40), and basic acoustic treatment ($50-100). Also factor in a year of audio editing software if you’re not using free options. The mic is just the centerpiece of a system.
10. Will AI-powered noise removal make room treatment obsolete?
AI tools like noise reduction and room reverb removal have improved dramatically, but they remain destructive processes that subtly degrade voice quality. They work best as polish, not foundation. A clean recording with minimal processing always beats a messy recording “fixed” by AI. Think of it like photography: you can Photoshop a photo, but starting with good lighting yields infinitely better results. Room treatment is your lighting.